Showing posts with label comfort. Show all posts

Monday, July 14, 2014

Produce Experimenting - Taro and Bacon Hash

Produce Experimenting - Taro and Bacon Hash

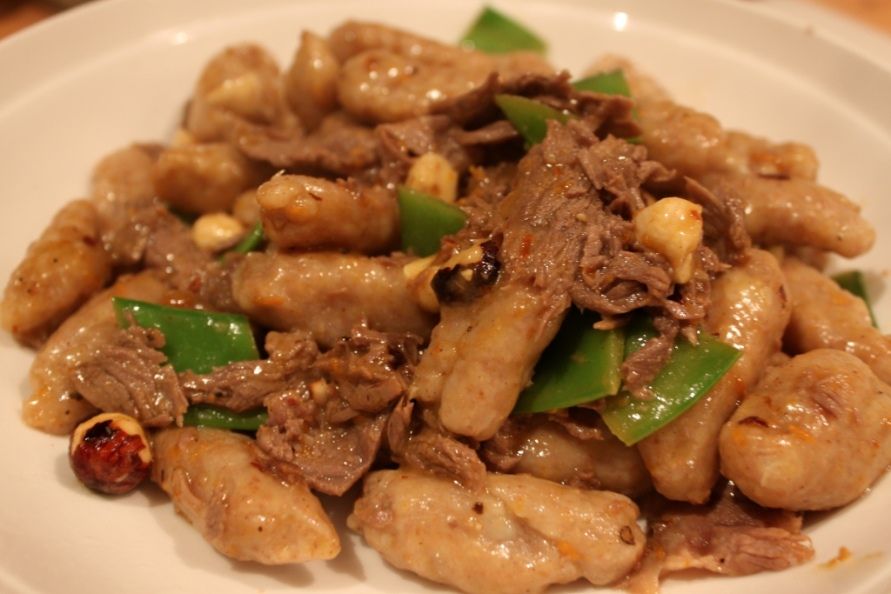
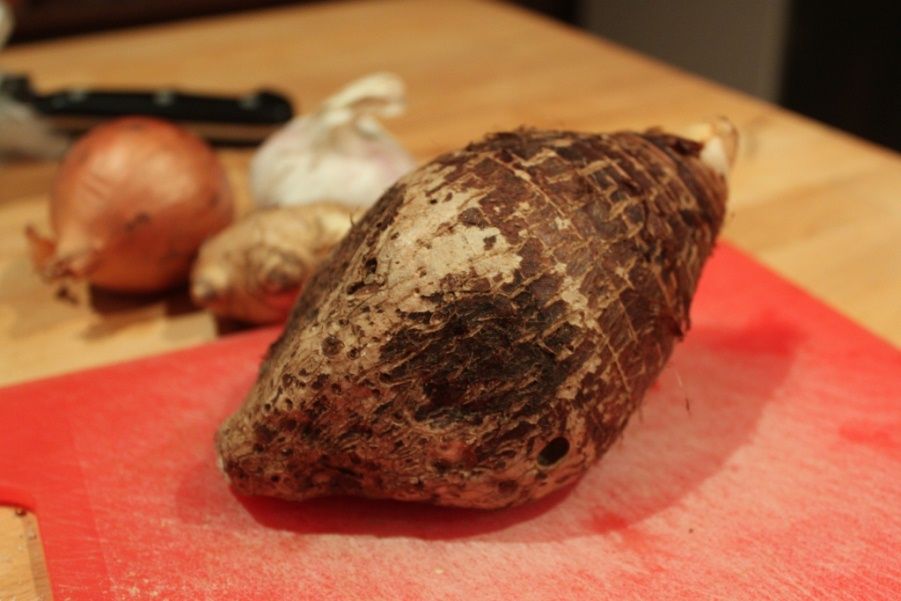
I bought a taro the other day. I saw it at the greengrocers and had never seen one before in the shops, so I got excited and bought one. Then realised I had absolutely zero idea of what I was supposed to do with it. I remember seeing it in recipes and on menus, but I couldn’t pick enough of a memory to know what to do with it. A quick google search indicated that as a tuber it can be cooked pretty much like a normal potato. But that it absolutely must be cooked to get rid of a chemical that has a toxicity that causes gout-like issues. Not a problem, I prefer my tubers cooked. It’s also used extensively to make desserts. Before I contemplate getting into taro desserts, I thought I’d cook one up in a more traditional-potato manner in order to get a feel for what it’s taste and texture is like. That also meant curries and stews were out.

So, that somewhat narrowed down what I was going to do with it. And it was another cold, rainy night which automatically lends itself to comfort food. I have said it before and I’ll say it again…I love breakfast. So breakfast for dinner is a pretty huge comfort food for me. 
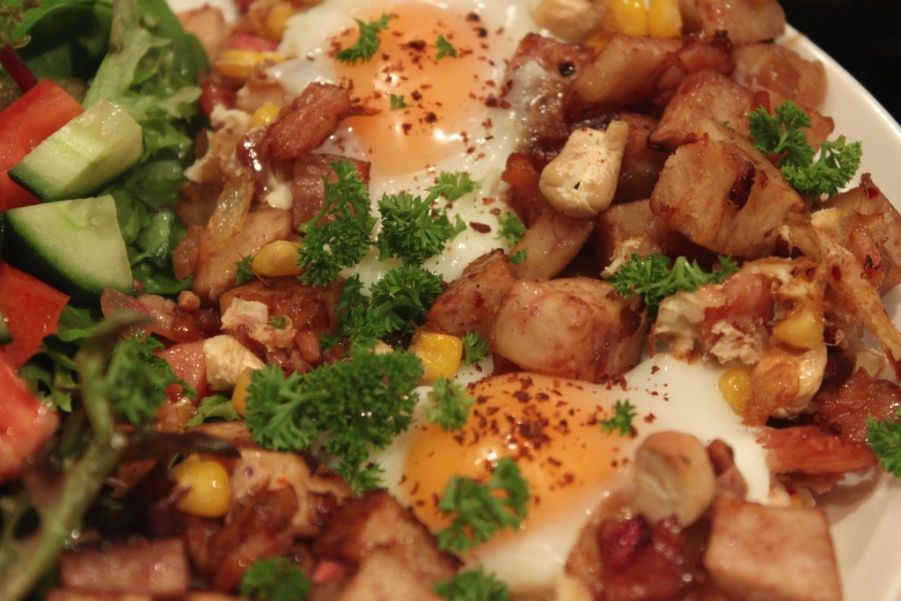
Taro Hash with eggs it was. Add some bacon – because it’s bacon. And some ginger, pomegranate and chilli for a pop of brighter flavours and you have a pretty amazing dish.

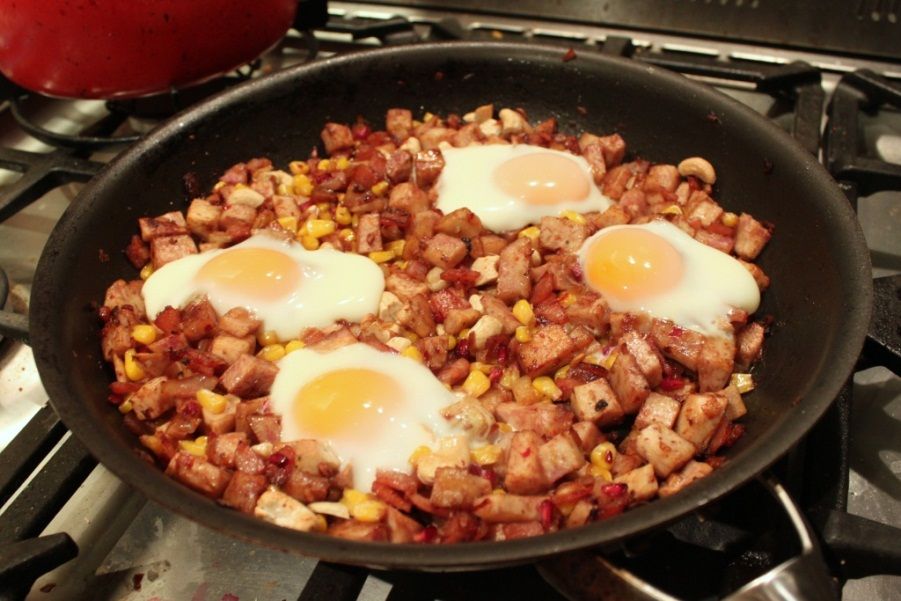
Serve with some fresh parsley and sumac scattered over the perfect yolks. Then eat with hot sauce. The taro cooked this way developed a slightly chewy texture and it has a nutty, somewhat earthy flavour which worked really well. I’m thinking I might need to try some more taro recipes in the future. Have you tried taro before? What’s your favourite way of preparing it? Comment below or email me!
Produce Experimenting - Taro and Bacon Hash

Taro and Bacon Hash

(serves 2 big servings)
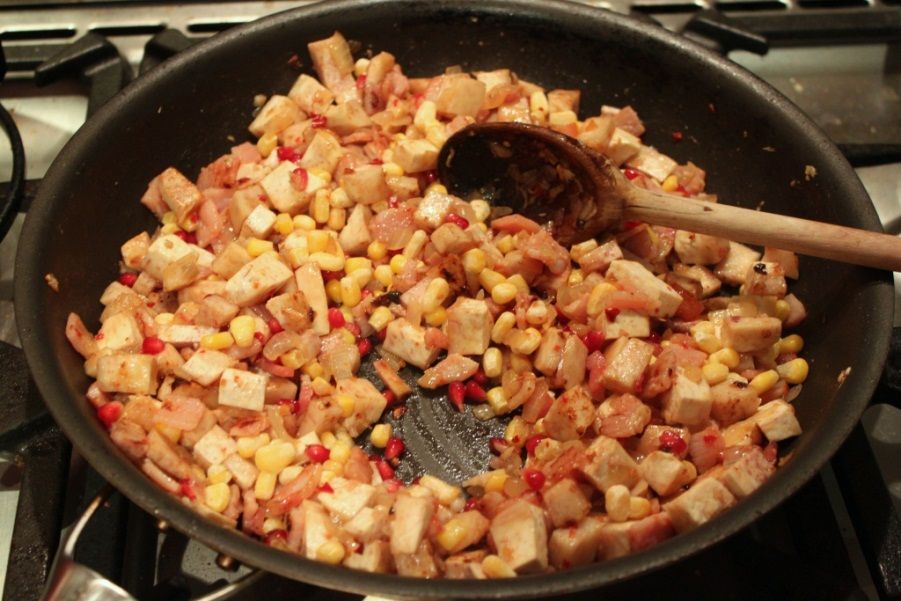
1 large taro, peeled and cut into 2cm dice
1 brown onion, diced
2 cloves garlic, minced
Generous grind salt and pepper
Thumb sized piece of ginger, peeled and grated
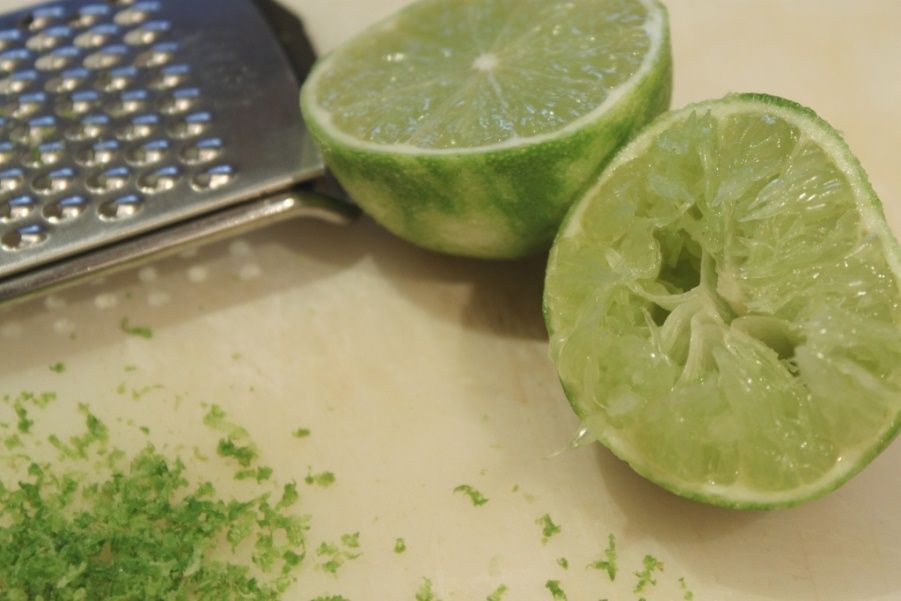
Juice of 2 limes
1 pomegranate, seeded
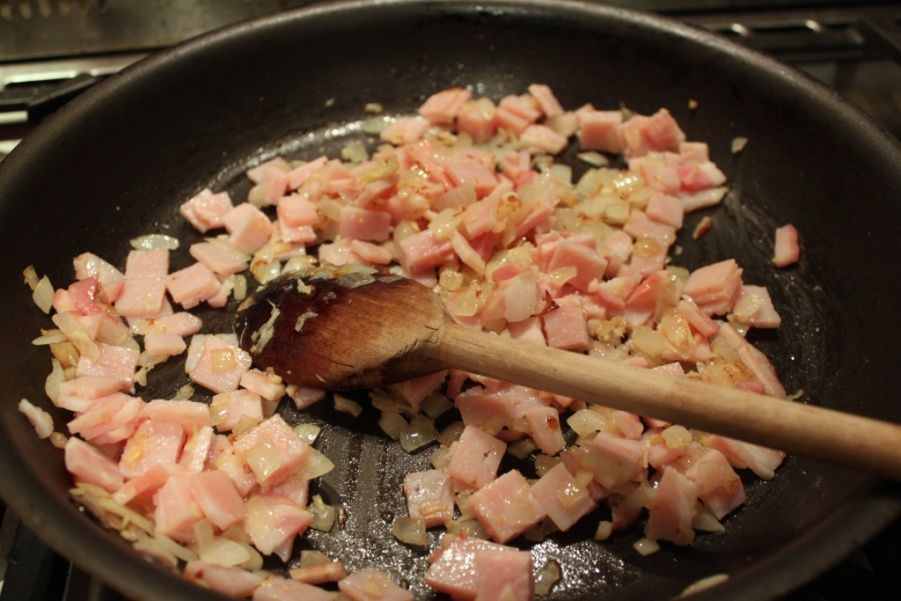
4 rashers eye bacon, diced
2/3 cup corn kernels
1 chilli, minced (or to taste)
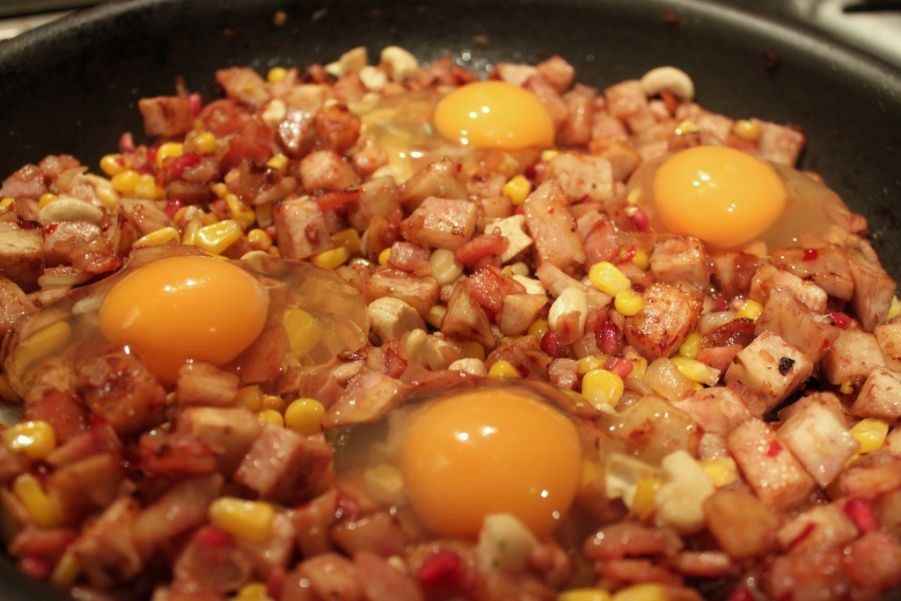
4 eggs

Heat a tall-sided pan that can also go into the oven to medium heat and add a generous splash of olive oil. Stir in the onions and salt and pepper, and cook 10 minutes or so until caramelising and soft and sweet. Stir here and there to make sure it doesn’t catch. Add the minced garlic and bacon and stir through.

Heat the oven to 175C

When the bacon is starting to colour and render out it’s fat, add the grated ginger, chilli and lime juice. Stir through the taro and corn, coating it in the oniony-mixture. Pop the pan into the oven and cook for 20 minutes or until the taro is mostly cooked and softer. Stir through the pomegranate seeds, then carefully crack the eggs into each ‘quarter’ of the pan. Pop back in the oven for 10 minutes or until the egg is cooked to your liking. I like runny yolks!

Sprinkle with some fresh parsley and sumac. Eat, curled up on the couch watching your favourite show!


Produce Experimenting - Taro and Bacon Hash

Monday, June 2, 2014

Happy WA Day - Pumpkin Spice Porridge


Happy WA Day holiday! My husband works on public holidays, so I play the single lady after he leaves for work. I sleep in until a leisurely hour, get up and make things that I like for breakfast that he doesn't necessarily agree with. So in honour of that luxury, I will do a post in real-time! Being a public holiday, I don't want to put too much effort in. And being the second day of winter means it needs to still be satisfying comfort style food. Something I can eat from a bowl, snuggled up on the couch, flicking through cook books.

I love sweet pumpkin dishes. Pumpkin Pie, Pumpkin and Maple Bacon Muffins, Pumpkin Spice Marshmallows and all that. Love it. Lance isn't the hugest fan. Nor does he particularly like porridge. So this dish is all me. I have some pumpkin puree from making a pumpkin mac and cheese a few days ago so this dish all came together in the time it takes to make the porridge and boil the kettle for my coffee.

I'm sure you've all made porridge before, so I'll leave it to you to cook it the way you do. Personally, I like to cook my oats in water (or coffee) with a pinch of salt and add milk or butter (or both!) once it's cooked. You can sub the butter for coconut oil, or coconut cream for a delicious vegan version of this dish.


Pumpkin Spice Porridge
(serves one)
1 cup cooked porridge (made from 1/3 cup rolled oats)
3 heaped tablespoons pumpkin puree
1/4 tsp ground ginger
1/4 tsp ground cinnamon
pinch ground nutmeg
1 tsp maple syrup (plus an extra to drizzle  if desired)
1 tsp unsalted butter
6-8 crushed walnuts

Cook the oats to by your preferred method.

In a small dish, mix the pumpkin, spices and maple syrup. Microwave for 1 minute to heat the mixture.

Stir pumpkin mixture and butter into porridge. Top with crushed walnuts.

Tuesday, February 11, 2014

Crab Pasta with a Gin and White Chocolate Sauce


I know that I suggested that you ‘cook’ a ceviche brulee for Valentine’s Day dinner, but I thought I’d also give you a second option. Also seafood. Also containing gin. And this one is a little more Valentine’s Day traditional in that it also contains chocolate! I’ve dabbled with savoury chocolate dishes a few time. This, so far, is my favourite. The sweetness of the crab pairs with the sweetness of the white chocolate and the red peppercorns provide just enough spice to temper against the sweetness. You’ll possibly have noticed I’m also really into gins at the moment. The one I used in this one is made in West Australia, so it might be a little harder for you to find. You can sub it in for a gin of your choice, but the citrusy hit that “Sabre” has is really suited to this dish. If you can get it, definitely give it a go, it’s really nice!

Given that Valentine’s Day is also soon – if you can’t find crab meat by Friday, I’ll also allow you to sub in prawns.

In the photos you’ll see I served this with a salad of leaves and sour cherries. The tartness of the cherries really pops with the richness of the pasta and makes it a complete meal. And given the gin and citrus, harks back to the Aviation cocktail that I’m a big fan of. That would be this dish’s perfect pre-dinner cocktail!


Crab Pasta with Gin and White Chocolate Sauce
200g crab flesh
¾ cup The West Winds“Sabre” Gin
Zest and juice of one lime
1 tsp coriander seeds
1 tsp pepper corns
½ tsp sea salt
2 shallots, thinly sliced
2 tbsp olive oil
2 big cloves garlic, minced
50g white chocolate, finely chopped
1 tbsp butter
250g pasta

 
Cherry Salad
Mixed salad leaves
12 cherries, roughly chopped
½ zucchini, thinly sliced into rings
Assorted toasted nuts/seeds (I used pepitas, pine nuts, almonds, sunflower seeds)
Salt & pepper

 
Put a pot of salted water on to boil. When boiling, add the pasta to cook at the point where the garlic is cooked.

In a dry frypan, toast the coriander seeds for 30 seconds or so on medium heat until fragrant. Grind with the peppercorns. Set aside.

In the same pan, gently warm the olive oil and sautee the shallots for 5 minutes or so until translucent. Do not allow to colour. Add the garlic, salt, pepper and coriander seeds. Cook for a further 5 minutes. Add the lime zest, juice and gin, stir through really well and allow to reduce by about half – another 5 minutes or so.

Add the crab, stir well. Then mix in the white chocolate and butter, stirring frequently to allow everything to come together as the chocolate and butter melts.

At this point, the pasta should be al dente. Drain, then toss into the crab sauce. Serve immediately.


Sunday, September 22, 2013

Dilemma - Cauliflower Gnocchi with Burnt Butter & Orange Sauce with Hazelnuts, Lamb and Snow Peas


So after replacing our broken dishwasher a few months back, our fridge has decided to slowly stop working as well. I'm not sure why my whitegoods are all abandoning me! But the fridge has brought up a few issues that have been swirling around in my head. Firstly - do I transplant my time-machine of old invitations and post cards and take-out menus and magnets and a calendar from 2011 onto the new fridge, or start with a clean slate? The next issue relates to some frozen cauliflower.

See, we have two fridges - one outside 'drinks fridge' and the everyday fridge that's in the kitchen where it should be. This is so common in Perth where for the majority of the year you want your drinks cold. And plentiful. The power companies tell you that the old outside fridge is just a power-drain and not a good idea - and yet we can't give them up! I know that come December, that extra fridge space isn't 'extra', it's just space. Every inch of both fridges are full of watermelon and rockmelon and every colourful vegetable you can imagine and then you can try fit in some drinks. Maybe. I was telling an overseas friend that we had two fridges and she was blown away. It just seems so unnecessary in places that don't regularly get above 35C, I guess! On the opposite end of the spectrum, I visited Germany at Christmas time as a teenager and I was so delighted to see my host family chill their wine by placing it in a planter box outside the kitchen window. So novel and different to the way we live in Perth!

So our outside fridge is an old hand-me-down fridge and it has just the one setting - COLD! So now that our kitchen fridge has one setting too - OFF, everything has been moved outside temporarily. And it's frozen the cauliflower. I had two of them, because of a sale at the Nanna Shop, both froze solid. Well, what to do with frozen cauli? I love the crunchiness of fresh cauliflower. I love make cauliflower "rice" salads. I love using them with dip. I'm not a huge fan of soggy, fully cooked cauli. But I am not going to throw out two otherwise perfect cauliflowers. So I made soup with one. And cauliflower gnocchi with the other. The soup was a standard cream of cauliflower soup. Nice and simple. The gnocchi however. Oh. My. Goodness. Nutty and delicious. It's fiddly, but give it a go! So good!

To make the gnocchi, first you have to make cauliflower mash, then the gnocchi. Like you would a traditional potato gnocchi. I've split it up into different stages to make it easier to describe. The first night, I served it with this lamb and orange butter sauce, the next night with a simple Arrabiata sauce. Both were good! And I still have enough leftover gnocchi in the freezer for two more meals.


Cauliflower Mash
1 head, chopped into smaller florets
4 garlic cloves, diced
water to cover
big pinch salt

Put all ingredients in a big pot. Bring to the boil, then simmer until the cauliflower is tender. Approximately 30 minutes. Mash mixture, then put into a fine mesh sieve to remove all of the extra water. Allow to cool completely whilst draining.


Gnocchi with Spelt and Hazelnut
Cauliflower mash (1 think I ended up with 3-4 cups)
1 egg
1 tbsp salt
4 + cups wholemeal spelt flour
1/2 cup hazelnut meal

Combine mash, salt and egg in a bowl and mix well. Add the hazelnut meal and 1/2 cup spelt flour. Mix well, then add more flour 1/2 cup and a time until it comes together into a big ball of dough. I think all up I needed about 4 1/2 cups of flour for the amount of mash I had.

Turn out onto a floured surface and knead until the dough is smooth.

Put a large pot of water with a big pinch of salt on to boil.

Cut the dough into pieces and roll out into a rope, and cut into pieces. I made mine around 1cm wide, 3cm long. Roll over a fork to shape the gnocchi. Repeat for all of the dough. I recruited my husband to help with this process.

About 20 pieces at a time, carefully drop them into boiling water. When they float to the surface, scoop them out with a slotted spoon and set aside in a bowl. Whatever you aren't using that night, freeze.


Burnt Butter and Orange Sauce with Hazelnuts, Lamb and Snow Peas
100g unsalted butter
big handful of hazelnuts (approx. 2/3 cup)
zest and juice of two oranges
20 or so snow peas, cut into 2cm pieces.
2/3 cup shredded roast lamb
Enough gnocchi for 2 people
lots of fresh cracked pepper to serve

In a frypan on medium-high heat, toast the hazelnuts until fragrant and darker brown. Set aside to cool, and when you can, rub between your hand to remove the skins. Roughly chop.

Put the butter into the same frypan, allow to melt and then swirl around as it  turns brown and nutty smelling. Add the zest and juice, mix around to full incoporate into the butter and add the gnocchi. Stir to coat and keep stirring for a few minutes. Add the lamb, stir it through, allowing it to heat through. Add the snow peas and cook until they soften slightly and turn brighter green.

Just before serving, toss through the hazelnuts.


Wednesday, August 21, 2013

Comfort Food - Avocado Soup

Have I told you about "The Nanna Shop" before? I'm not sure, but it's very likely as I shop there all the time. It's actually called Cannington Fresh Markets, but my nanna used to live just down the road from there. Growing up, my siblings and I used to walk with her down to The Nanna Shop to buy her a newspaper and us some lollies. It's changed a lot over the years, it used to have a butcher and bakery inside the store but now it's just the one big shop. It has lots of good fresh produce, imported sauces, tinned goods, continental fare, cheese and smallgoods. Usually, if a recipe calls for a slightly left-of-centre ingredient, my first port of call to try find it is The Nanna Shop. Funnily, now my husband and his sister, along with various friends and even my work receptionist now refer to it as The Nanna Shop as well!

The main reason I shop there frequently is for the fruit and veg. And one of the best things they have a buckets of produce at the back of the store. If you can use it, these bulk buy buckets are excellent value. Especially for those things that are a little on the expensive side normally, like mangoes, mushrooms and avocadoes. Usually the produce in the buckets are slightly smaller than what is normally sold in the per kilo section, but is still excellent quality. As summer approaches, I always head straight to the back first, hoping that mango season has started. It's one of my signals that summer is on it's way.

One thing I always buy there is bags of avocadoes. Always. I love avocadoes. Occasionally, I end up with too many and the two of us can't finish them before they've gone a little too soft. Which is where this soup came in. Creamy and subtle and oh-so-easy, this is a great vegetarian soup by itself, or as served here, awesome with the chipotle chicken as an extra kicker. Especially in this got-cold-again weather. And it would be remiss of me to not mention that crispy bacon would then make it a Vegetarian Recipe Improved By Bacon.

The wine in the last photo is from Darlington Estate. I highly recommend you eat there at some point. Awesome food.


Chipotle Chicken
2 chicken thighs
1/4 cup chipotle sauce
1 tbsp rice bran oil

Avocado Soup
adapted from here
1 tbsp rice bran oil
1 onion, finely chopped
1 garlic clove, minced
5 cups vegetable stock
3-4 small ripe avocadoes
2 stalks silverbeet, centre white bit removed and shredded.
Handful coriander leaves for garnish
2 jalapenos, sliced, for garnish

Pour the chipotle sauce over the chicken thighs and allow to marinade for 20 minutes or so. Heat the oil in a frypan, BBQ or grill and cook the thighs until done, about 5 minutes per side. Set aside, but keep warm.

Heat the second lot of oil in a pot over a medium heat. Add the onion and cook until translucent. Add the garlic and cook another few minutes until very fragrant.

Add the stock and bring to the boil. Reduce heat to low, add the silverbeet and simmer for 5 minutes. Take off the heat.

Add the avocado and blend the whole thing with a stick blender until smooth. Return to a low heat and simmer for 5 minutes, or until warmed through.

Slice chicken, then put in the bottom of the serving bowls and pour the soup over the top. Garnish with jalapenos and coriander.

Serve with corn chips, if desired.


Wednesday, August 14, 2013

Obsession - Pretzel Rolls


Pretzel Rolls. If you are like me and love nothing more than sitting down to freshly baked bread, still warm from the oven , smeared with butter - then these two words are going to change your life. One of the sponsors of the Sweet Escape retreat was LaBriola bakery, and they gave Alejandra (and hence us) a whole bunch of pretzel rolls. And they were good. Addictively good. Can't eat just one good. When I got home, I immediately googled recipes for pretzel rolls, needing them in my life. I've made these twice now and love them. They're not quite as good as the La Briola ones, but they are definitely an adequate at-home substitute! Both batches were gobbled up by my guests pretty quickly, so that's a fairly good indication of yumminess.

The first time I made them, I made the dough in a stand mixer that is woefully poor at actually mixing more than the small centre of the bowl where the blade sits and had to knead the rest in by hand. I can't wait til I finally get around to saving enough for a KitchenAid! The second time I made them, I used a breadmaker to mix the dough. This method worked well, but the dough ended up a bit sticky, so I needed hand-knead in some extra flour. Until I get my KitchenAid, I will be sticking with the breadmaker method, and checking earlier on to see if the dough is sticky. If you have a good stand mixer, then that will work.

As I said, these are perfect with just some butter, but also great as slider buns. Let's face it - any time you need a bun these are perfect. I realised I forgot to take a photo of them sliced up with said butter or fillings - but I was too busy eating them. Maybe next time, I'll pop it on instagram


Pretzel Rolls
adapted from here

1 1/2 cups warm water (as hot as your tap gets)
1 tbsp dry yeast
2 tsp sugar
4 1/2 cups plain flour
1 tsp salt
4 tbsp melted butter
1 beaten egg for glazing

Poaching:
8 cups water
1/4 cup bicarb soda

Start by melting the butter, and setting aside to cool slightly.

Pour the warm water, sugar and yeast into the bowl of the breadmaker, stirring together. Leave it to sit for about 10 minutes until it's foamy.

Add the flour, salt and butter, then set the breadmaker on the dough setting. Watch as it comes together, and once it's all combined (about 10 minutes into kneading for mine), gently and safely touch the dough to see if it's 'sticky' to the touch. If it is, add a tbsp of flour at a time until it's not sticky. I added an extra 4 tbsp to mine.

Once the dough is a good consistency, leave the dough setting to finish and it will do it's first rise in the bowl of the machine.

For standmixer, follow the breadmaker instructions as above up until the rise - it'll need around 5-10 minutes of kneading time. Then cover bowl with plastic wrap and place in a warm position for 1-2 hours until doubled in size.

Lightly flour your work surface and drop the ball of rised dough out onto it. Knead lightly into a flatter disc and cut into 16 equal pieces for slider sized buns. Take each piece and roll around in both hands, so you have a smooth ball. Place on a baking sheet lined with baking paper. Repear with all the pieces of dough, leaving room on the tray for them to rise again. Place in a warm spot 30mins to an hour. They won't quite double again, but will look puffier.

Now it's time to prepare for baking! Preheat oven to 225C. Place the water and bicarb soda into a large pot and bring to a simmer. Beat the egg for the glaze.

Carefully slide each roll "flat" side down into the poaching water, let it sit for 30 seconds, flip it over and let it sit "round" side in the water for another 30 seconds. Flip it back over and fish it out with a slotted spoon and pop it back on the baking sheet, flat side down.

Brush each poached roll with the egg wash and slash a deepish line across the middle with a knife (if desired, you can sprinkle salt on top, too).

Bake the rolls in the oven for 15-20 minutes, rotating trays half-way through, so the rolls are an even golden brown and sound hollow when you tap the base. Allow to cool slightly before eating. Best served warm!


Sunday, May 26, 2013

One Dish, Two Ways - Italian Potato Salad/Italian Potato Bake

My cousin is about to head off on a European adventure, and seeing as she will be away for her birthday, she decided to have a bit of a get together before she went. I offered to bring a dish and was told maybe a potato salad. The rest of the food being served was going to be Italian, which got me thinking. Italian Potato Salad? Does such a thing exist? I've never eaten a potato salad made with Italian flavours - sounds like experiment time!

I guess I should say up front, that I've never been the hugest fan of potato salad. I think because a lot that I've eaten have had a really strong, overly 'mayonnaise-y' ness to them, and not a lot of content beyond boiled potatoes and peas. And boiled potatoes are one of the blandest foods in the world. I like to pimp mine out a bit more. 

The previous night I had fried up some hot salami with slices of garlic for a different dish and thought that was the perfect start for Italian Potato Salad. I didn't have enough potato to make a salad large enough to share, so I added some sweet potato to the mix. And I had an abundance of red capsicums, so I roasted up a few to add a lovely sweetness and new texture to the mix. The sauce was made simply with greek yoghurt, dried oregano, sun dried tomatoes and seeded mustard. The result was pretty darn impressive. Something I would eat a whole plate of as a meal.

Unfortunately (but luckily for me), it was forgotten in the fridge at the party, and I got to take it home with me. Being a cold night, and my husband hoping for a hot dinner asked - could it be heated? Well...yes. The sauce is just greek yoghurt. I don't see why not! I poured the whole thing into an oven dish, added some thinly sliced Provolone cheese and baked it for 20 minutes until warmed through and the cheese was golden. Heaven!

So here's a dinner perfect two ways - Italian Potato Salad and Italian Potato Bake. (I forgot to take photos of it until it was out of the oven. Sorry!)


Italian Potato Salad/Bake
6 baby potatoes, quartered
2 small sweet potatoes, cut to similar size
2 small red capsicum
half hot salami sausage, thinly diced
2 large cloves garlic, sliced
300g Greek Yoghurt
1/2 teaspoon dried oregano
1/2 teaspoon smoked paprika
5 sun-dried tomatoes
2 teaspoons whole-seed mustard

Put the potatoes into a pot of water and bring to the boil. Once boiling, add the sweet potato. When potatoes are tender, but not completely soft, strain out water and rinse with cold water to stop cooking. Store in fresh cold water until ready to assemble.

Meanwhile, roast the capsicums in a hot oven until the skin starts blistering. Place in a bowl and cover with plastic wrap to sweat a few minutes so you can peel the skin off. Discard innards and slice into strips. Set aside to cool.

Fry the salami in a medium hot pan, once starting to crispen and release oils, add the garlic slices and cook until everything is toasty. Drain really well on paper towels.

To make the sauce, blend the greek yoghurt, oregano, paprika and sundried tomatoes in a food processor or blender until well mixed and the tomatoes are chopped. Add the mustard and pulse a few times to distribute.

Combine all of the ingredients and add the sauce a bit at a time to ensure it's not too saucy. I ended up with too much sauce. Serve as potato salad.

To make the bake:
Heat oven to 180c
Pour potato salad into a casserole dish, add Provolone slices or thinly sliced/grated cheese of choice over the top and bake for 20 minutes or so until cheese is toasty and the sauce bubbles slightly add the edges.

This photo is of it served to the rear with a super-quick seafood marinara pasta I cooked while the potato salad became a potato bake!