Thursday, August 28, 2014

Winning at Cupcakes - Chocolate Cupcakes with Salted Caramel Filling and Peanut Cream Cheese Icing


Winning at Cupcakes - Chocolate Cupcakes with Salted Caramel Filling and Peanut Cream Cheese Icing


I don’t eat a great deal of cake. When I was a kid I baked a lot, and I love it…but there’s not a huge need for cake in my day-to-day life and I wouldn’t want it to go to waste, so I don’t bake terribly often. Which is why there isn’t a great deal of desserts on my blog, seeing as this is more a food diary more than anything else. This means, when I do have 
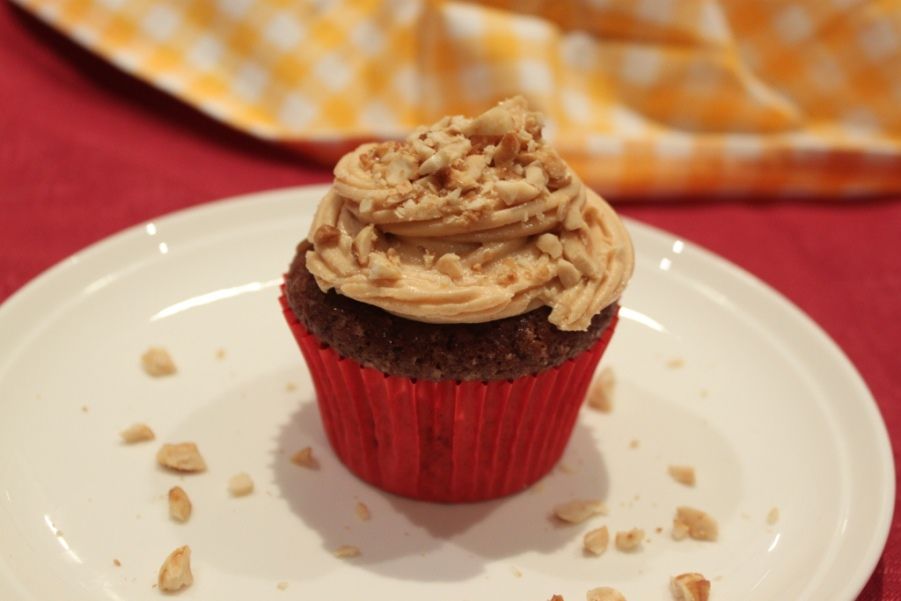
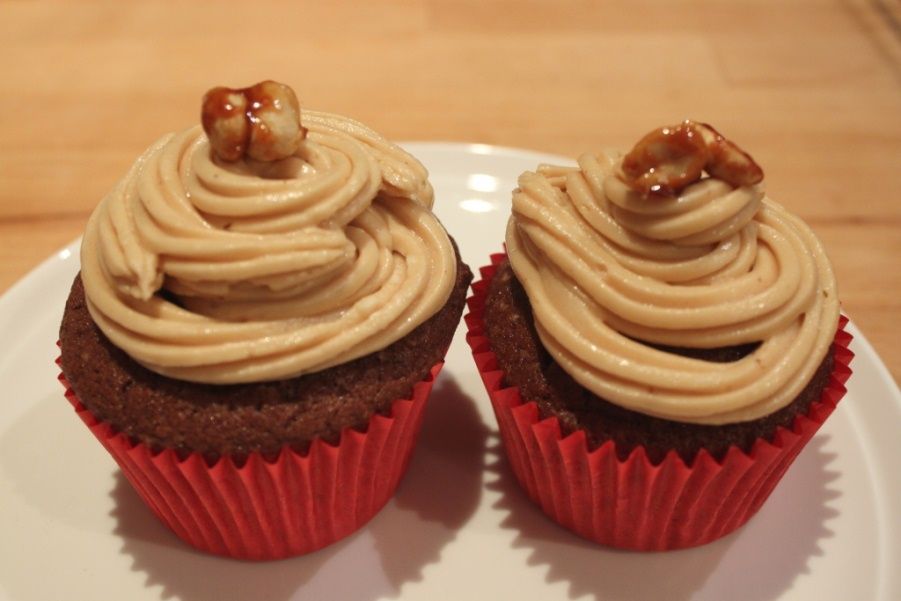
to bake cake for something, I tend to go ridiculous. These cupcakes are ridiculous.

I was designated cupcakes for a Cousins’ Catch-Up games night, and these are what I brought along. This chocolate cupcake recipe is my go-to chocolate cake/cupcake recipe. It is simple, it’s easy and the cakes are always great. It produces a nice, moist and fluffy cake. 
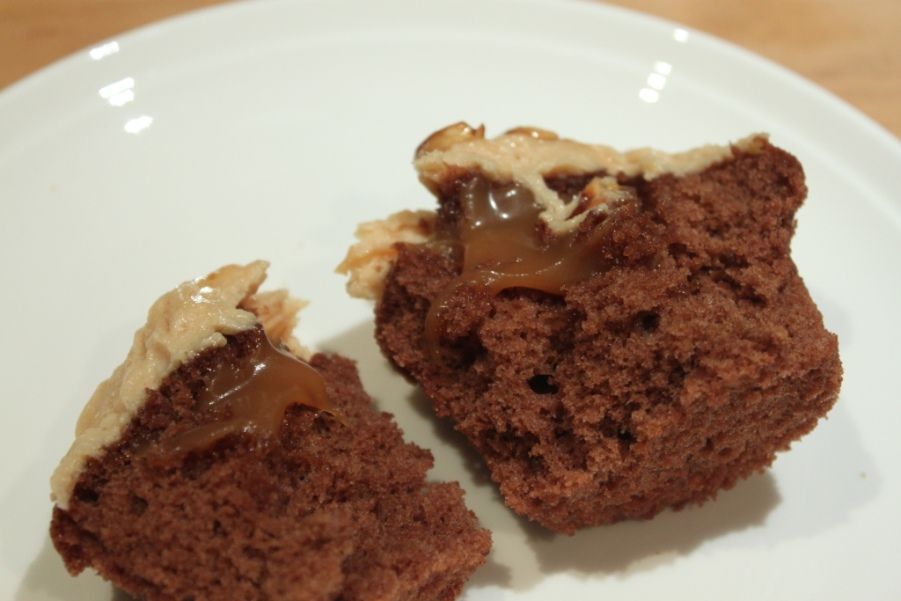
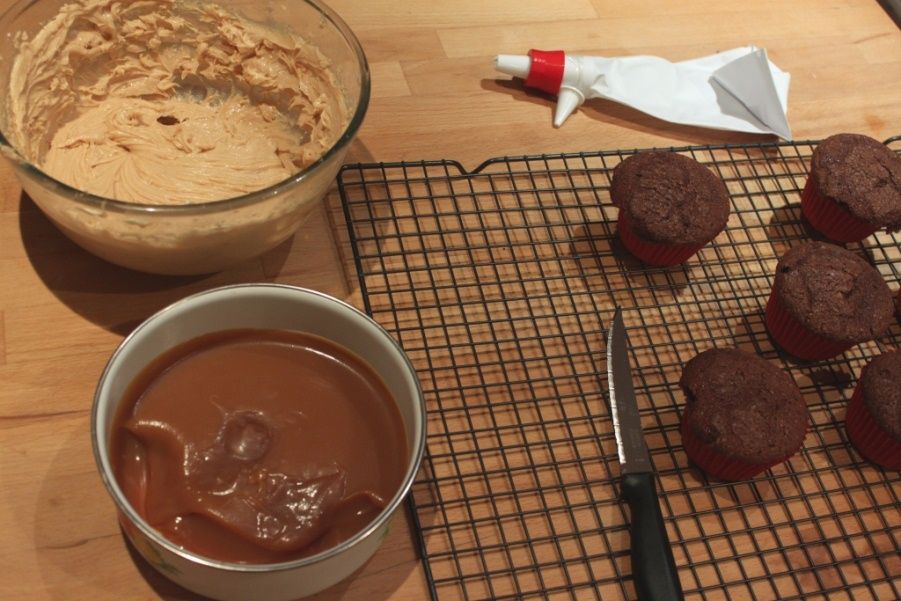
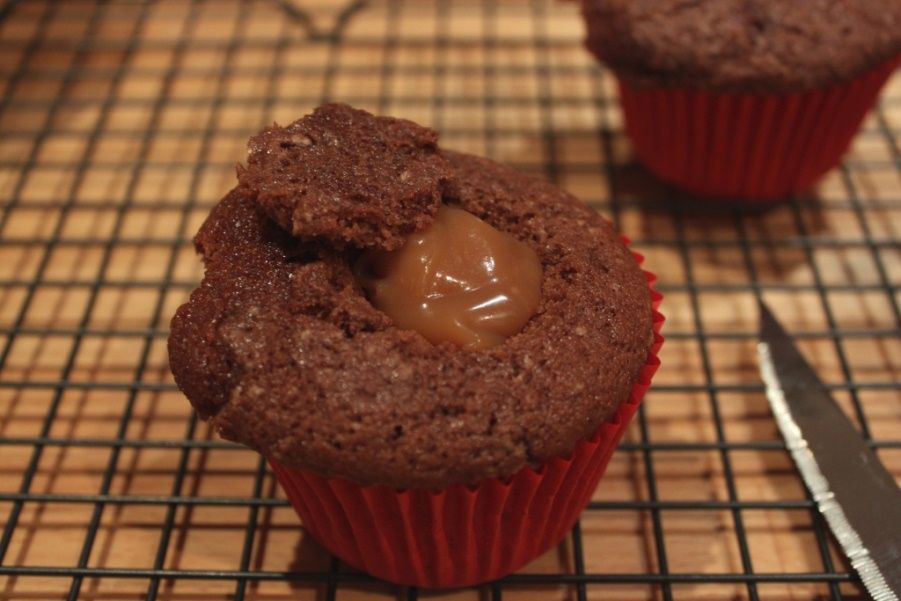
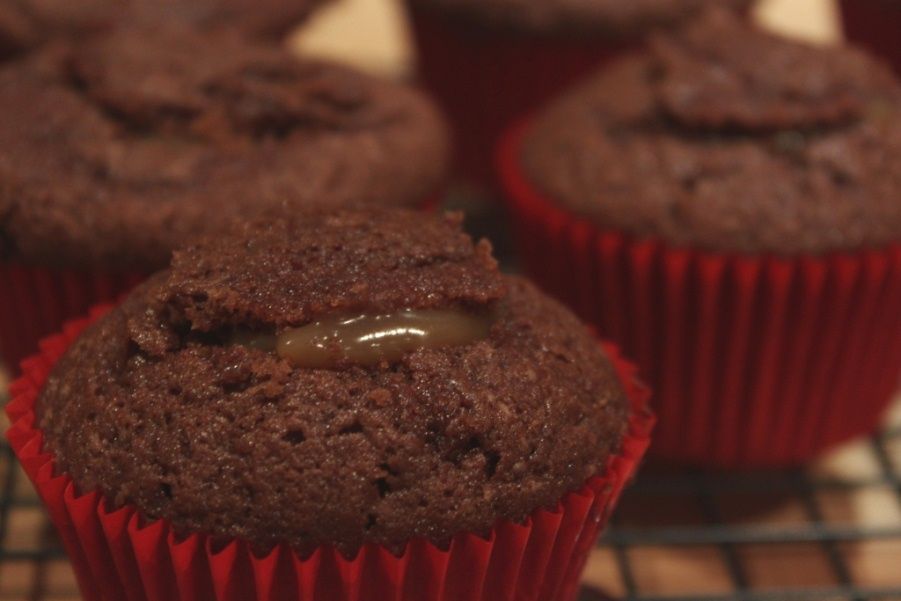
I then cut a little hollow to fill with salted caramel, because I’m obsessed with my caramel at the moment. You’ll remember it from my Salted Caramel ChocPavlova, and I used it for Chocolate Tacos, and for my bacon bark and Lance has taken to making salted caramel and melted chocolate dessert nachos with it. Oh. My. Goodness. That is delicious. You should do that. And then I added icing. I must admit, I’m not a big buttercream fan. To me, buttercream icing is just plain icing you used to make when you were a kid, but then it got a fancy name and now it’s the shizz. But really, it’s just butter and icing sugar. Nice and it definitely has it’s place, but nothing spectacular, and too much when piled high on a 
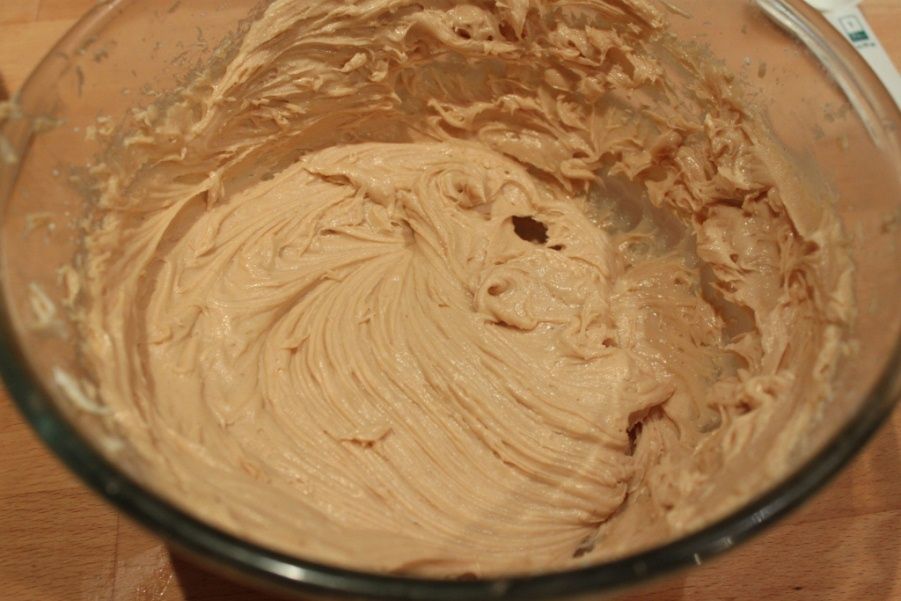
cupcake. I tend to scrape half of it off. Give me cream cheese icing with that 
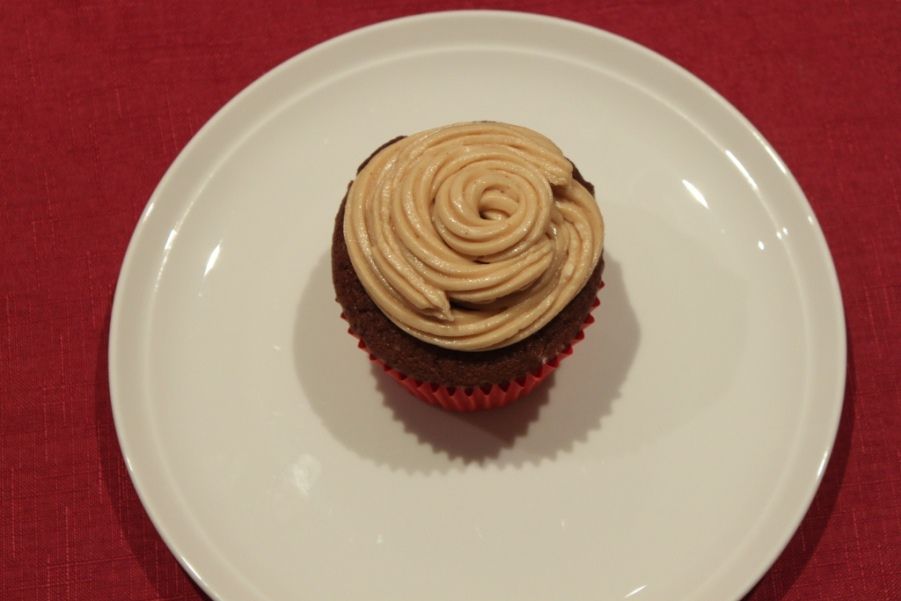
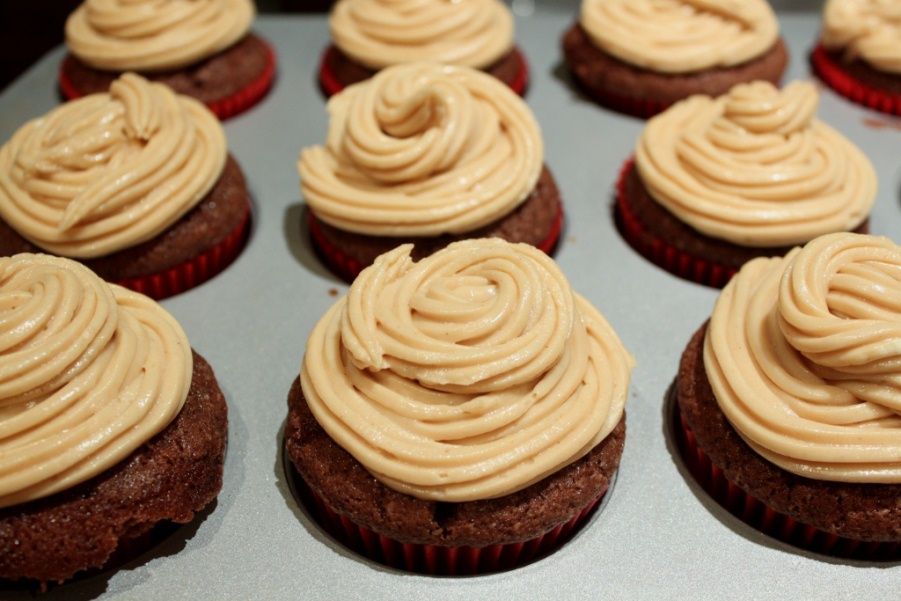
delicious cheese-cakey tang and you have me won, though. This cream cheese 
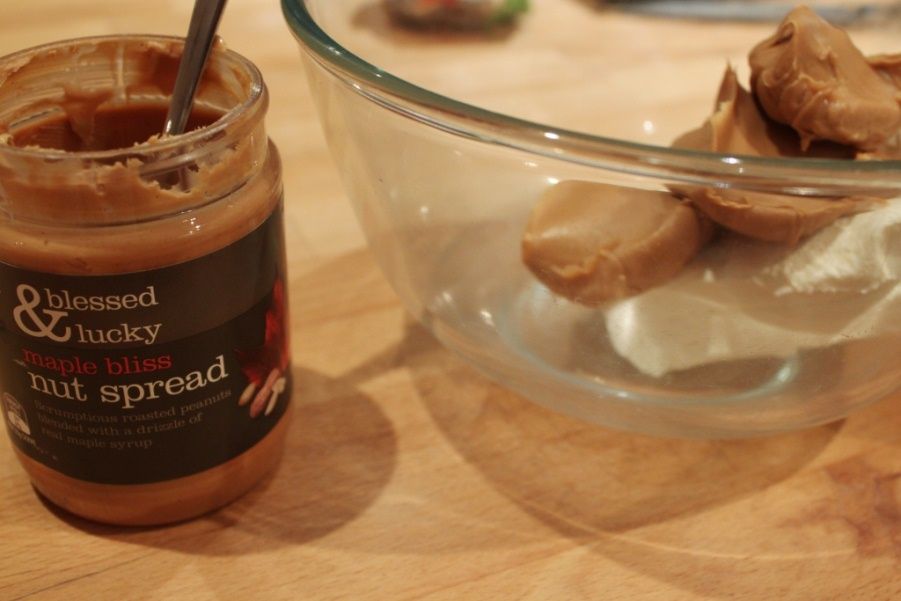
icing is peanut butter flavoured. Because peanut butter and chocolate is a 
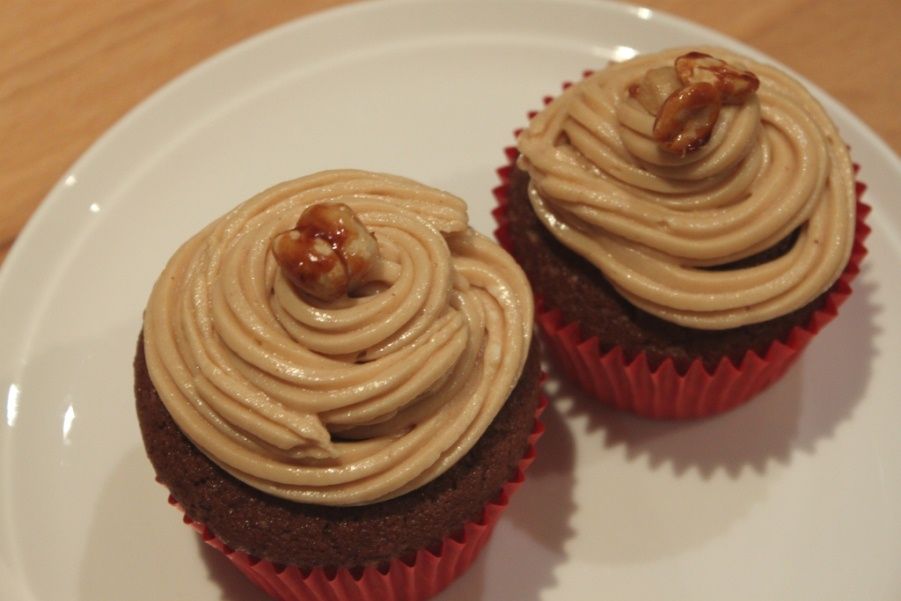
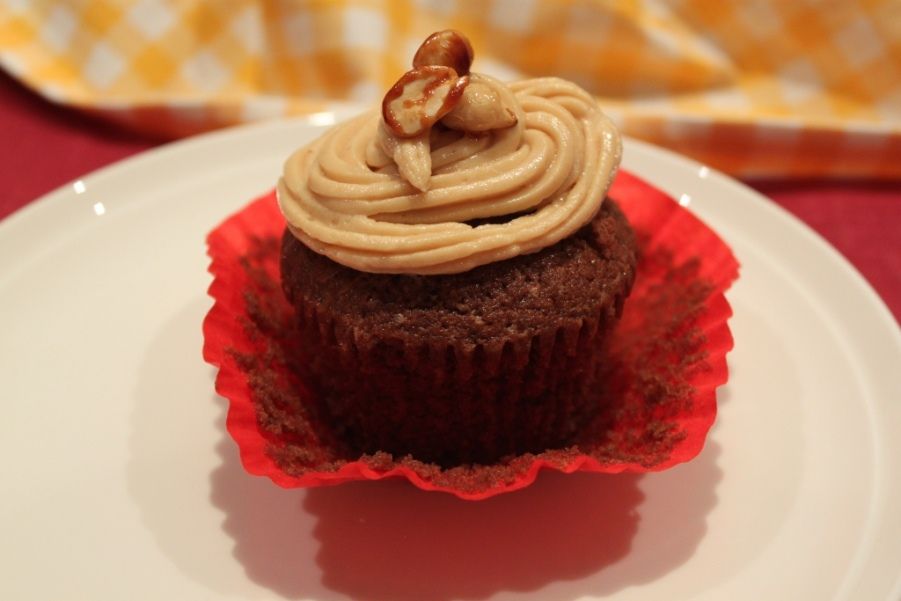
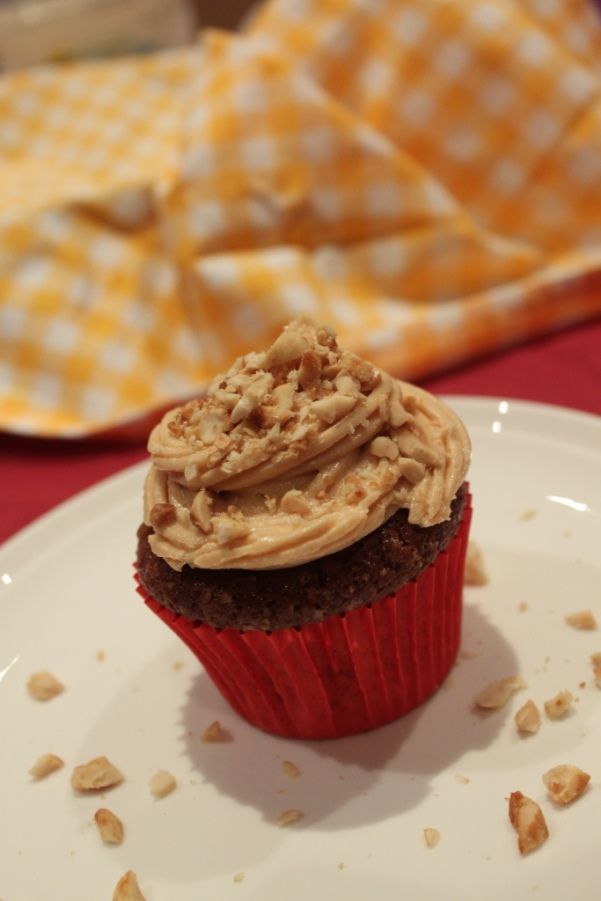
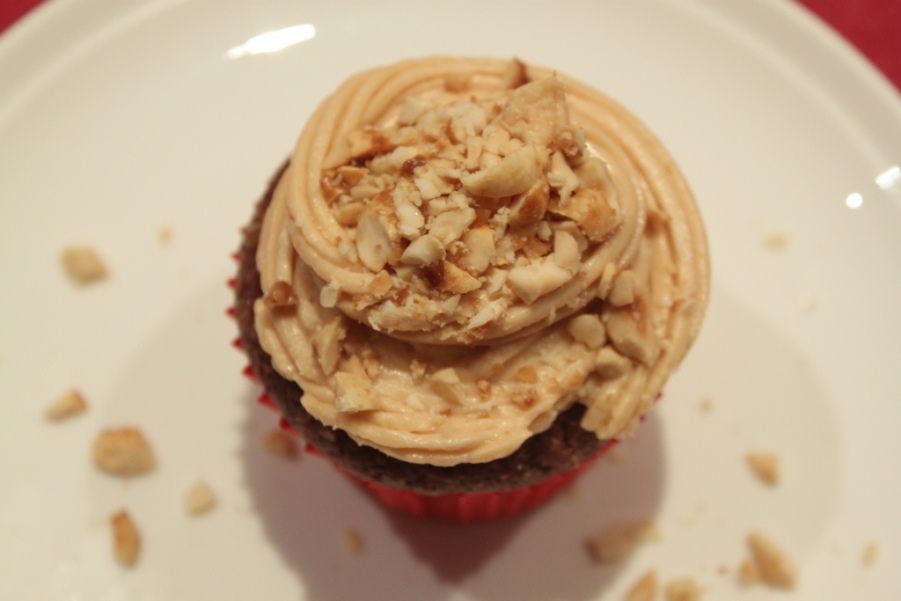
match made in heaven. You'll see I used Maple Peanut Butter - that's because it was the only smooth peanut butter I had. You can mimic that by adding 2 tsp maple syrup to normal peanut butter. To just make it the most ridiculous cupcake ever, I then topped it with peanut praline. Epic, yeah?

These are not for the faint hearted. They are *quite* sweet. I recommend keeping them refrigerated after icing them and taking them out around 30 minutes before serving. The warmer they are, the sweeter they are. You can tone them down a bit by having just the cupcake and icing, but at Cousin’s Catch-Up Games Night, I play to win!

Speaking of ‘when you were a kid’…we played Nightmare that night. Do you remember that ol’ VHS game? Yeah, it was awesome…my little maggots!


Winning at Cupcakes - Chocolate Cupcakes with Salted Caramel Filling and Peanut Cream Cheese Icing


Winning at Cupcakes - Chocolate Cupcakes with Salted Caramel Filling and Peanut Cream Cheese Icing

Winning at Cupcakes - Chocolate Cupcakes with Salted Caramel Filling and Peanut Cream Cheese Icing

Chocolate Cupcakes

1 1/2 cups plain flour
5 tablespoons cocoa powder
1 1/3 cups sugar
3 tsp baking powder
pinch salt
85g butter
1 cup buttermilk
2 eggs
1 tsp vanilla extract

Peanut Butter Cream Cheese Icing

1 cup icing sugar
250g Philadelphia Cream Cheese
4 tablespoons Peanut Butter

1/4 cup Caramel Sauce
Peanut Praline, chopped

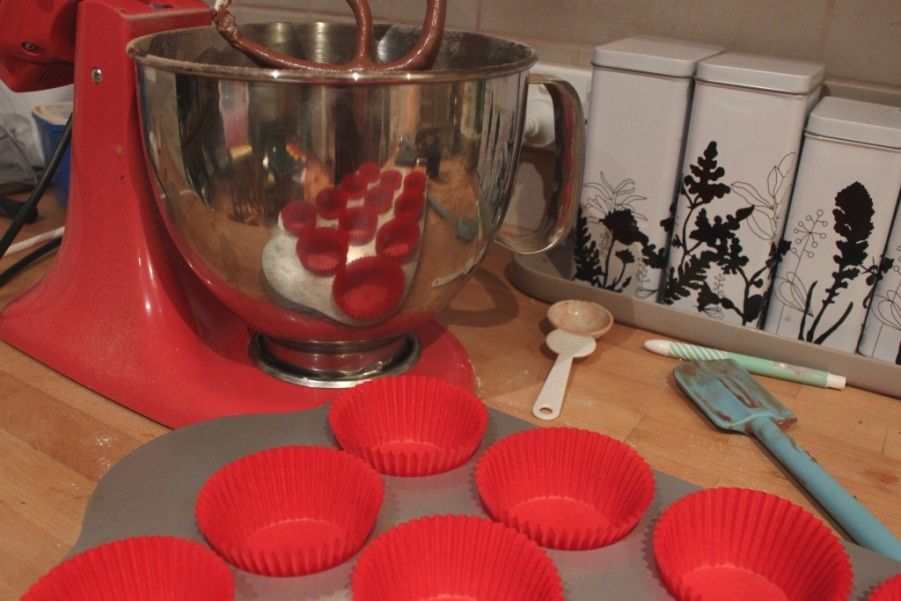
Preheat oven to 170. Line a 12 cupcake tray with cases.

In the bowl of a standmixer, blend together the flour, cocoa, baking powder, salt and butter on a slow speed until it combines to look like breadcrumbs.

In a separate bowl, whisk together the eggs, then the buttermilk and vanilla. Pour half of this into the flour mix, then beat on high to make sure there are no lumps. Turn the mixer down to low and slowly pour the rest of the milk mixture in a steady stream. Mix for another minute or so until completely smooth.

Spoon batter into paper cases until 2/3 full, then place in the oven for 20-15 minutes. A skewer inserted into the centre should come out clean. Let cool in their pans for 10 minutes, then remove to a wire rack to cool completely.

Whilst cooling, make the icing. In a large bowl using a hand mixer, blend the peanut butter and cold cream cheese until combined. Add the icing sugar a little at the time and beat on medium high for 5 minutes or until light and fluffy. Don't overmix as it can separate. Refrigerate until ready to use.

When cool, use a thin pointed knife to cut a cone shaped circle down into the centre of the cupcake. Slice the pointed bottom off (and eat!!) and reserve the circular 'plug'. Spoon 1/4 tsp or so of caramel sauce into the hole, then cover with the cake 'plug'.

Use a knife or piping bag to decorate the cupcakes with the peanut butter cream cheese icing

Winning at Cupcakes - Chocolate Cupcakes with Salted Caramel Filling and Peanut Cream Cheese Icing


Tuesday, August 26, 2014

Marinaded to Perfection - Orange Chipotle Chicken with Braised Greens and Barley

Marinaded to Perfection - Orange Chipotle Chicken with Braised Greens and Barley

With the exception of slow-cooked meats, it’s very rare that the meat is the main star of our everyday meals. If I’m BBQing or grilling meat, I tend to leave it plain and cook it well, then make salads and sides that shine. Or make a kick-arse sauce to go on it. That tends to be the same when you eat out as well. It’s *just* a steak (albeit a good quality one) until they add the mushroom sauce or pepper sauce or red wine jus. Partly at home, it’s a cleaning issue. And partly a timing issue. I rarely think ahead enough to marinade the meat before I cook it. But the acid and booze in this orange juice marinade only needs a small amount of time to make a big impact on the chicken. So you can marinade the meat for half an hour while you prep the veges and get the barley cooking. You then use the same marinading liquid to braise some kale and cabbage and bam! Flavourful dinner with zero wastage. Cook the chicken over a medium-high heat to get a nice crispy brown outer layer and still have the centre juicy.

The barley with greens still is kinda the star here, with it’s tart/sweet pops of cranberries, briny capers, crunchy cashews and sweetly braised greens – but the chicken holds it’s own without any further accompaniment if you served just the chicken. And that is a rarity in my household!

Marinaded to Perfection - Orange Chipotle Chicken with Braised Greens and Barley


Orange Chipotle Chicken with Braised Greens and Barley

Marinade

Zest and juice from one orange
Thumb tip size piece of fresh ginger, finely grated
30mL dark rum
1 chipotle in adobo, minced
3 tbsp olive oil

3 chicken thighs
¾ cup barley
1 ¼ cups water
¾ tsp vegetable stock powder (or salt)
Olive oil
1 onion, diced
2 cloves garlic, minced
2 stalks celery, diced
½ bunch kale, ribs removed and shredded
¼ cabbage, shredded
2 tbsp dried cranberries
1 tbsp capers
¼ cup roasted cashews
2 tbsp minced fresh parsley

Mix all of the marinade ingredients in a glass or other non-reactive bowl add the chicken thighs, toss to coat. Cover with plastic wrap and leave to marinade for 30 minutes. Drain the chicken, reserving the marinade.

In a medium size pot, mix together the vegetable stock powder or salt. Add the barley. Cover, bring to the boil, then reduce to a simmer. Cook until the barley is tender, but still retains it’s shape and a slight ‘chew’ – around 25 minutes.

While the barley is cooking, heat a splash of olive oil in a frypan over medium heat. Add the onion and cook 10 minutes until softened and golden. Add the garlic and celery and cook a further 5 minutes or until the celery has softened. Add the kale and cabbage, stir it through to coat in the onion mixture, add the marinade and braise for 10-15 minutes until the kale and cabbage is wilted and cooked through.

Heat a second pan or a BBQ grill to high and add the chicken pieces. Cook for 5 minutes until nicely brown on the outside and half cooked through, then turn and cook on the other side for 3-5 minutes until cooked through and brown on the other.

Stir the cooked barley through the braised greens, take off the heat and stir through the cranberries, capers, cashews and parsley.

Plate up the barley, then place a grilled chicken piece on top

Marinaded to Perfection - Orange Chipotle Chicken with Braised Greens and Barley

Thursday, August 21, 2014

Fancy Midweek Meal - Polenta and Vegetable Stacks

Fancy Midweek Meal - Polenta and Vegetable Stacks

In keeping with my ‘learning to cook new things’ decision, I decided to tackle something that’s been on my list for a while. Polenta. The thing that mainly worried me about polenta is that in most recipes I had seen they contained the one phrase that strikes fear into my heart – ‘stirring constantly’. When something is a side dish, I can’t be ‘stirring constantly’. But there’s been a few blog recipes about that had somewhat demystified the process somewhat and used the phrase ‘stirring here and there’. Stirring here and there I can do! I wanted to make polenta cakes, rather than the polenta ‘mash’ and every recipe for that that I had ever come across insisted that you needed to refrigerate overnight, then cut the polenta into shapes, then either bake or fry to make the crispy polenta cakes. I also didn’t have the time and patience for that. Not on a weeknight. So I just spread it out in the tray and baked it immediately, leaving the cutting until it was baked. It takes about 40 minutes to bake, but it was a good result for a lazy man’s version of this. I will give the chill, cut and fry method a go at some point, but this is a good option for week nights. The chill, cut, fry method also lends itself more to thicker polenta squares.

The sauce you might recognize as my hot white bean dip. It’s almost identical with the removal of the oil and the addition of using some water to thin it out. The texture becomes almost like a tomatoe-y herby béchamel. The roast pumpkin and capsicum work perfectly with the sauce and polenta. And being lazy again, I scrubbed the skin of the butternuts but didn’t bother peeling them. If you don’t want to eat them, simply peel them off after they’ve cooked.

While I am telling you about how lazy I am with midweek cooking, let me tell you about Mexican chorizo. Unlike Spanish style chorizo, Mexican chorizo isn’t cooked/cured and it has to be cooked before eaten. It’s essentially a flavoured mince. I haven’t ever seen it available here in Perth BUT, you can make it really easily at home, following Alejandra’s recipe. When I do have a spare half hour or so on the weekend, I whip up a batch of this, freeze it into individual ‘sausages’ ready for a super easy flavor hit. It makes the most amazing tacos and scrambled egg and potato hash and…the list goes on. It’s so much easier to be lazy during the week if you can occasionally do some prep work. The spicy chorizo here really makes this dish, but if you really don’t want to make some yourself, simply find a nice spicy style sausage, remove the filling from the casing and fry up as below. Or, at a pinch, dice up some normal chorizo and fry until some fat renders out and it’s crispy. But you really want that smokey/spicy hit to bring out the rest of the flavours in the dish.

A little sriracha on plating adds a little extra chilli kick. And if you’re really feeling lazy then you can serve the components separately and not even bother making it look fancy. But how pretty is this?

Fancy Midweek Meal - Polenta and Vegetable Stacks


Polenta

1/2 cup polenta
2 cups water
1/4 tsp fresh black pepper
1/4 tsp sea salt
2 tbsp olive oil
½ cup grated parmesan

Roast Veges

Top half of 1 small butternut pumpkin, skin scrubbed and sliced into 1cm thick rings
1 large red capsicum
Olive oil

Sauce

1 tin white beans (cannellini)
4 sundried tomatoes, cut into thin strips
1 cup water
½ tsp salt
3 sprigs thyme, leaves stripped
1 tbsp oregano, minced.

200g Mexican chorizo (or other spicy raw sausage, skins removed)

Line a lamington tray with baking paper. Preheat the oven to 170C

In a medium saucepan, bring water, pepper and sea salt to a boil. Pour the polenta in to the boiling water and stir quickly for a minute or so. Cook for around 10-15 minutes, stirring every few minutes until it thickens to a creamy mash potato consistency. It should pull away from the sides cleanly as you stir it. Stir through the parmesan, and then the olive oil.

Spread in a layer around 2cm thick in the baking paper and smooth over the top. Pop in the oven.

Line a baking tray with baking paper and spread the pumpkin slices out. Drizzle with olive oil. Cut the capsicum in half lengthwise and remove the core and seeds/membranes. Place skin side up on the baking tray . Chuck in the oven.

After 20 minutes, turn the flip the pumpkin slices. Check the polenta. If it’s solid and getting golden on top, gently flip the whole thing over with two spatulas.

Rinse the beans, then add to a medium pot with a cup of water. Bring to a gentle simmer. Using a stick blender (or a real blender), puree until smooth. Add the salt, thyme, oregano and sundried tomatoes, puree that all together too. Check for seasoning, then set aside, keeping warm.


Heat a frypan to medium heat and add the Mexican chorizo. Break it up with a wooden spoon and keep it frying until brown and crispy. Set aside, keeping warm.

Remove the capsicum and gently pull the skins off and discard. Slice into ribbons.

Take the polenta out, and cut into squares about the same size as the pumpkin rings. Cut one square into thin ‘chips’ for decoration.

To plate, add a slice of polenta, a ring of pumpkin, a few ribbons of roast capsicum. Spoon a few tablespoons of the bean sauce, then sprinkle some Mexican chorizo over the top. Repeat the pattern. Balance a few polenta ‘chips’ on top, then decorate with a thyme sprig. Dot some sriracha about the plate decoratively.


Fancy Midweek Meal - Polenta and Vegetable Stacks
Fancy Midweek Meal - Polenta and Vegetable StacksFancy Midweek Meal - Polenta and Vegetable Stacks
Fancy Midweek Meal - Polenta and Vegetable Stacks

Monday, August 11, 2014

Cornbread Crackers

Cornbread Crackers
Cornbread Crackers

So far, my ‘eat more cornbread’ new year’s resolution is going extremely well. With normal cornbread and cornbread waffles coming into a rotation, I’m averaging about once a month. I was recently laid up with the flu and I made a huge pot of ‘All the Veges’ Soup to help me get better. And given that I was laid up with the flu and didn’t want to do anything, I was happier than I normally am to have a frozen mini-loaf still in the freezer ready to slice and make the most amazing crackers to go with the soup. Variations of Alejandra’s Fruit andNut Crisps and the Choc Hazelnut Crackers from Always Order Dessert are a staple for me now, I make up the loaves based on what I have at the time and freeze them, so if people pop in I just toast them in the oven and in 15 minutes I have an amazing homemade snack.

Making the crackers while I was sick, I had a brainwave…they are essentially just a mini loaf of bread (sometimes I eat one loaf as fresh bread), so I should make a version with cornbread. Cornbread crackers was a thought that stuck in my head like a song that I could ‘taste’ and I knew as soon as I felt up to cooking again, I would be making.

For the cracker flavours, I wanted something smokey and spicy, something to pair with the sweetness of cornbread. I added pickled jalapenos, but not having as many as I’d like, I decided to add capers as well for the extra briney kick. Great decision. For me capers are one of those things that I get obsessive about, go through a few jars in a few weeks and then don’t buy them again for a while. I needed them for the Cuban Chicken and Corn Pie, and haven’t looked back. Add some sunflowers for a textural interest and some semi-dried tomatoes for some not-too-sweet sweetness and you have an amazing cornbread.

Freeze the loaves until completely solid (very important!!), slice as thinly and evenly as possible and re-bake and you have the most amazing crackers. Seriously.

Cornbread Crackers
Cornbread Crackers
Cornbread Crackers
Cornbread Crackers
Cornbread Crackers
Cornbread Crackers
Cornbread Crackers


Cornbread Crackers

2 teaspoon cajun spice mix
1 tsp dried oregano
1 cup cornmeal
1 cup plain flour
1 teaspoon baking powder
½ teaspoon salt
2 tablespoons sugar
1 ½ cups buttermilk
1 egg, lightly beaten

½ cup grated parmesan
1 tbsp capers
5 sundried tomatoes (not in oil), finely diced
1 tbsp finely diced pickled jalapenos
¼ cup sunflower seeds

Preheat oven to 200C. Grease 3 mini loaf tins

Mix cornmeal, flour, baking powder, salt, oregano, spice mix and sugar in a bowl.


Combine buttermilk and egg. Make a well in the centre of the dry ingredients and pour in buttermilk mixture. Stir gently to combine, then stir through the cheese, sundried tomatoes, capers and jalapenos, trying to evenly distribute all the add-ins.

Pour into prepared pans and bake for 20- 25 minutes until golden and spring back when touched. Take out of oven and cool in tins for 5 minutes, then cool on a rack until completely cold.

Individually wrap loaves tightly in cling-wrap and freeze overnight.

When ready to make crackers, preheat the oven to 150C

Using your best knife (I find a ham knife works best), slice the frozen loaves into thin slices, as evenly as possible and place on a cooling rack inside a baking tray. Bake for 10-15 minutes until crisp and golden, watching them so they don’t burn.

Take out of the oven and leave to cool. Then serve with your favourite dip (tzatziki and guacamole work particularly well with these flavours) or as part of a cheese platter. Or as dippers in Avocado Soup!

Cornbread Crackers
Cornbread Crackers
Cornbread Crackers
Cornbread Crackers
Cornbread Crackers
Cornbread Crackers