Showing posts with label dessert. Show all posts

Monday, May 4, 2015

Showing Your Working - Healthy Espresso Jelly Sandwich Breakfast Cookie


Showing Your Working - Healthy Espresso Jelly Sandwich Breakfast Cookie


Sometimes I feel like presenting my cooking or recipes to people is like a Maths test. Not in the sense where x butter + y flour + z eggs and sugar = cake kinda way and people question my x, y and z’s. But in the sense that a question I get asked most frequently is – how did you come up with that? I’ve said that people refer to my cooking as quirky, rather than conventional and I feel like my little recipe pre-amble is my chance to “show my working”. So I try to present where my thinking starts, winds and ends up at the finished dish. I think a little background shows that it’s not quirky for quirky’s sake, there’s a lot of thought going into the flavour combinations, the textural elements, the overall nutritional content and purpose of the dish. So, on that note, this is my maths for what is a pretty novel, healthy and absolutely delicious breakfast. Something delicious enough to be a dessert, but healthy enough to start your day with, guilt free.


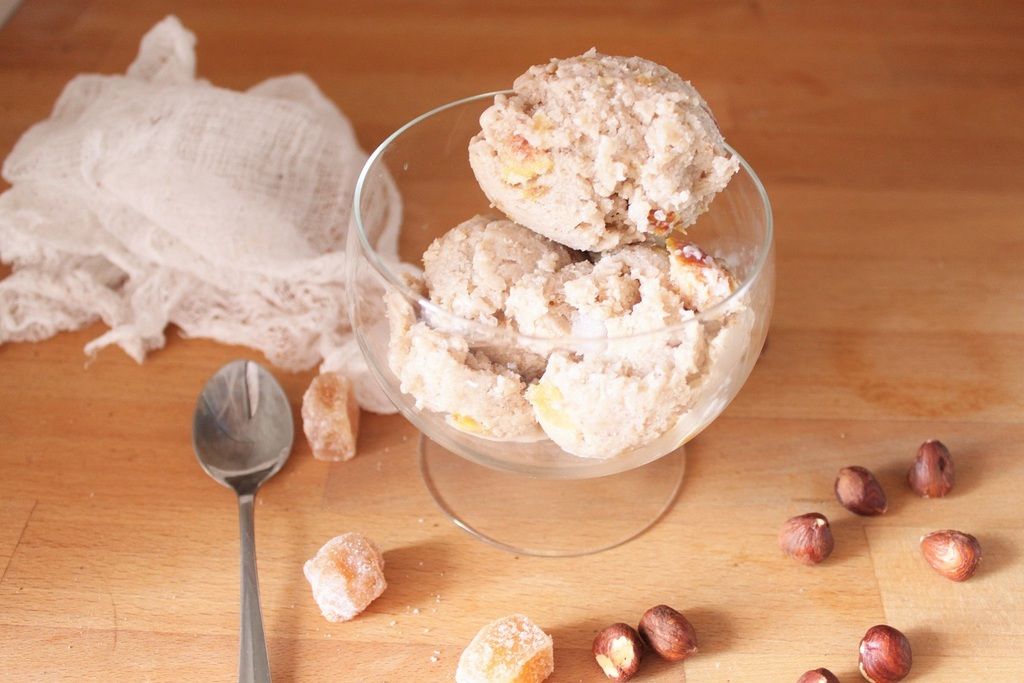
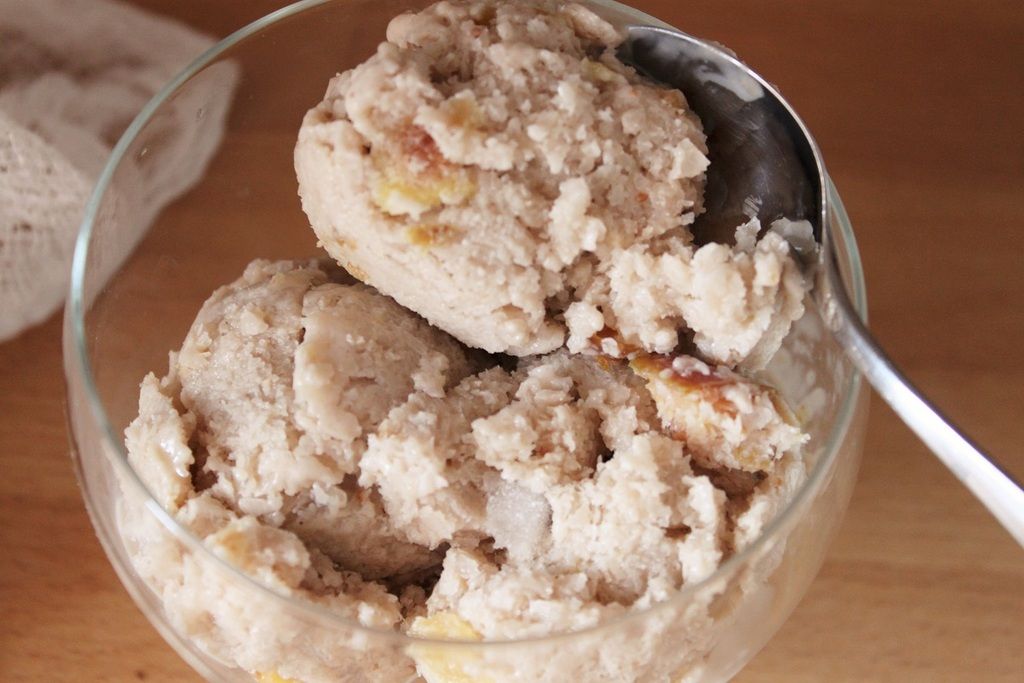
In order to beat the traffic, I get to work early and eat my breakfast at my desk while I check through my emails. It’s usually some form of oats with cultured dairy (yoghurt or buttermilk), fruit and nuts & seeds. Carrot Cake Bircher muesli is a firm favourite, but requires a bit more prep than I can usually be bothered with, so that’s more a once every few months deal. My most regular staple is cold-brewed coffee overnight oats. Caffeine + whole grain awesomeness in one bowl. Soak it overnight, then add some fruit (usually bananas, prunes or berries) crunchy nuts and/or seeds before eating. It is so good and portable….but you’re left with dishes. That’s absolutely fine at work, where there’s a kitchen to do the dishes. But I needed a no-dishes portable breakfast. Something still full of healthy whole grains, the fruit and nuts and….the coffee. All in one. Enter the breakfast espresso jelly cookie.

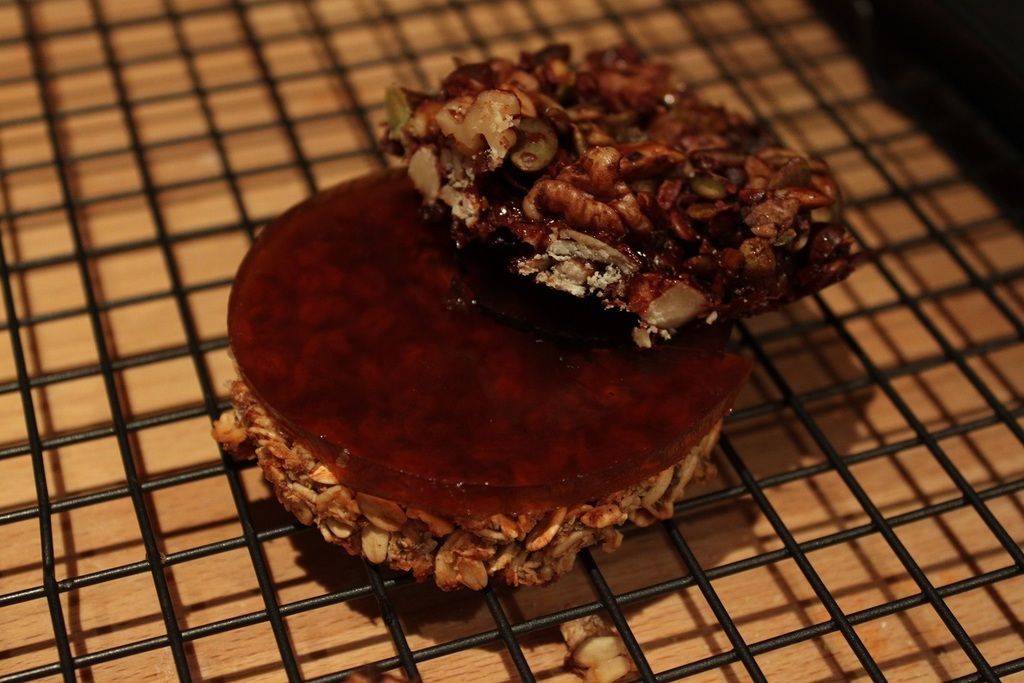
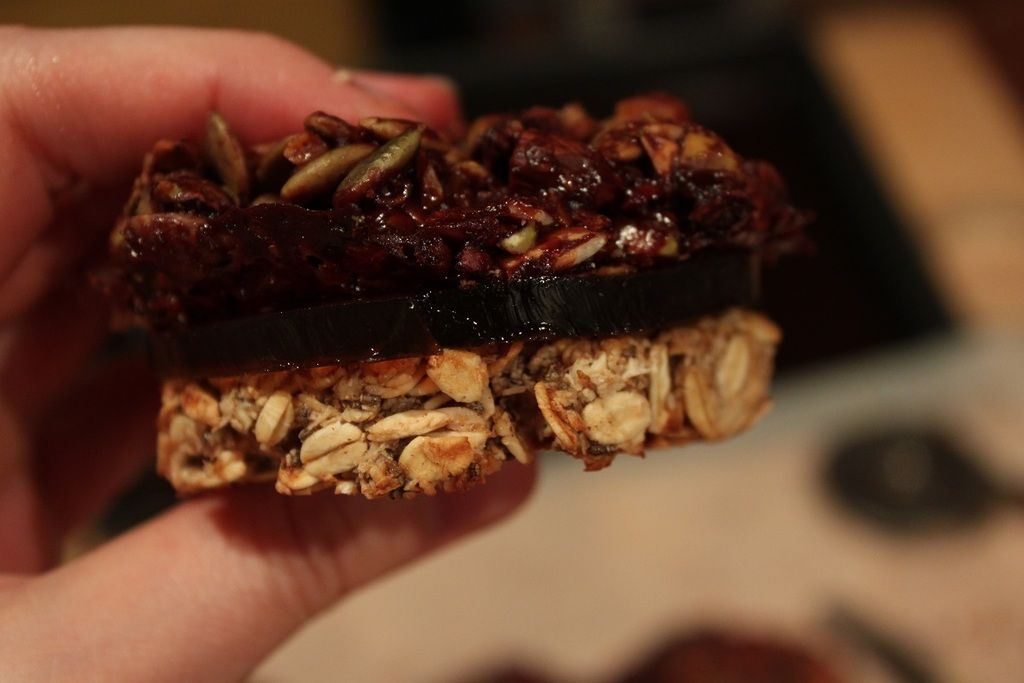
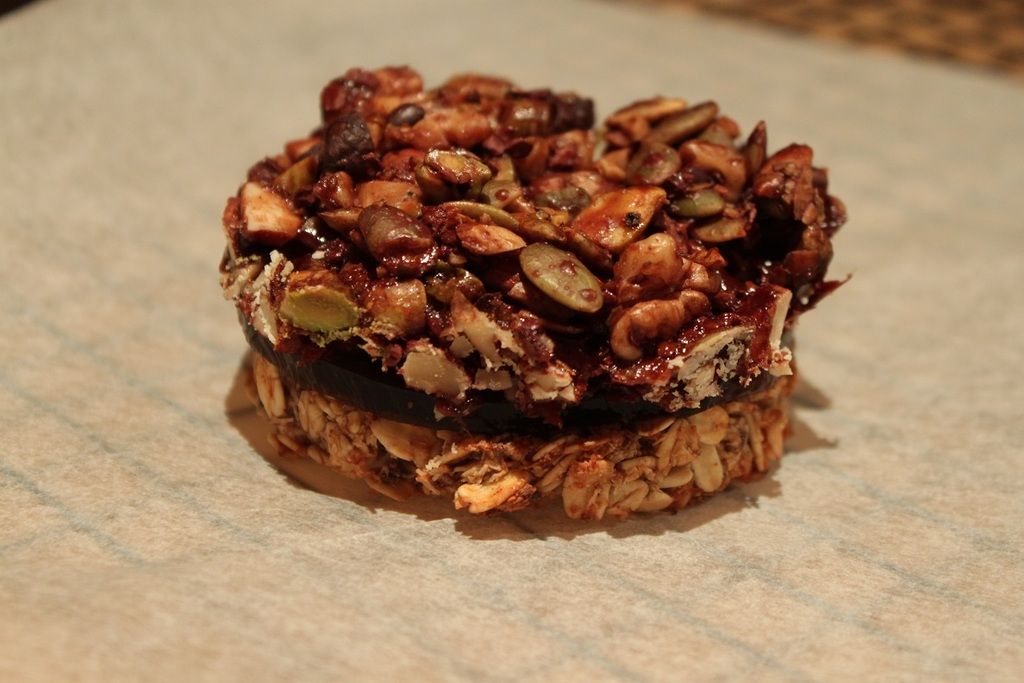
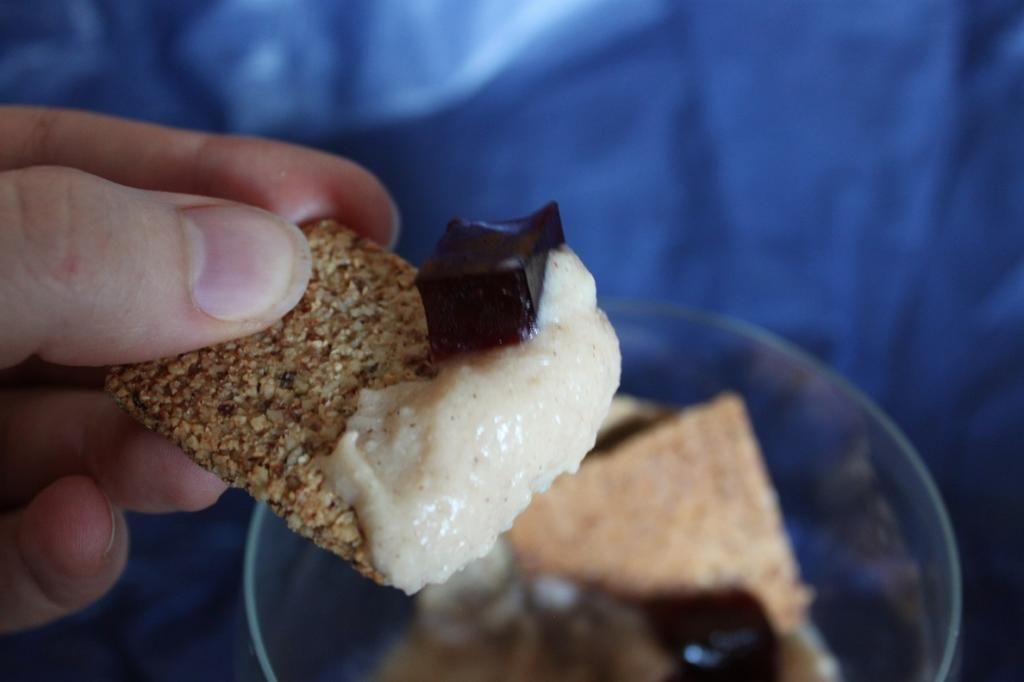
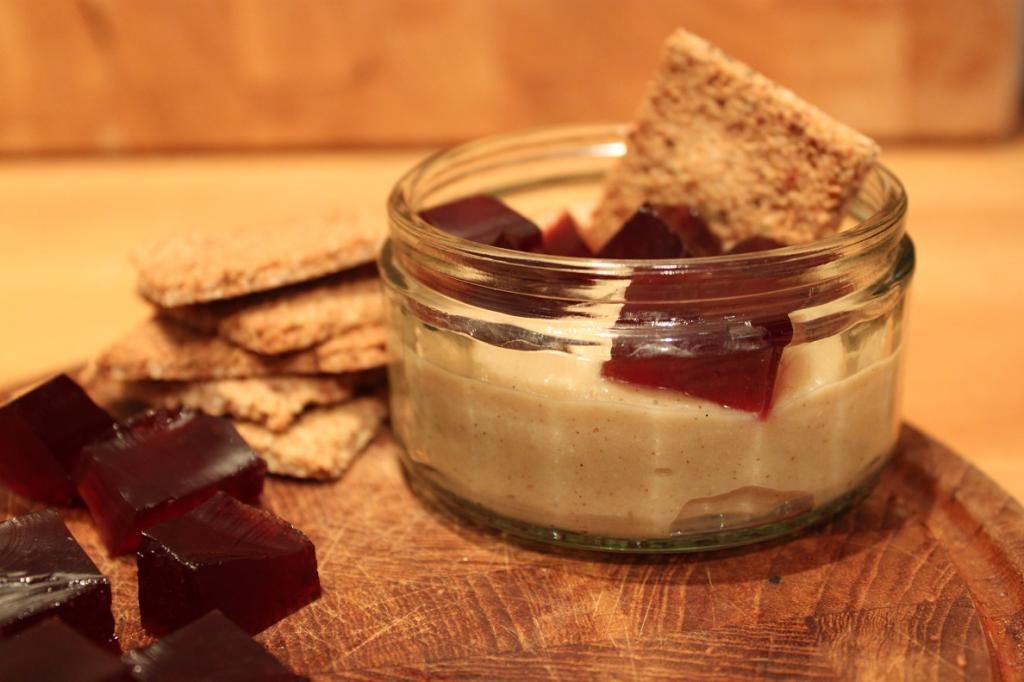
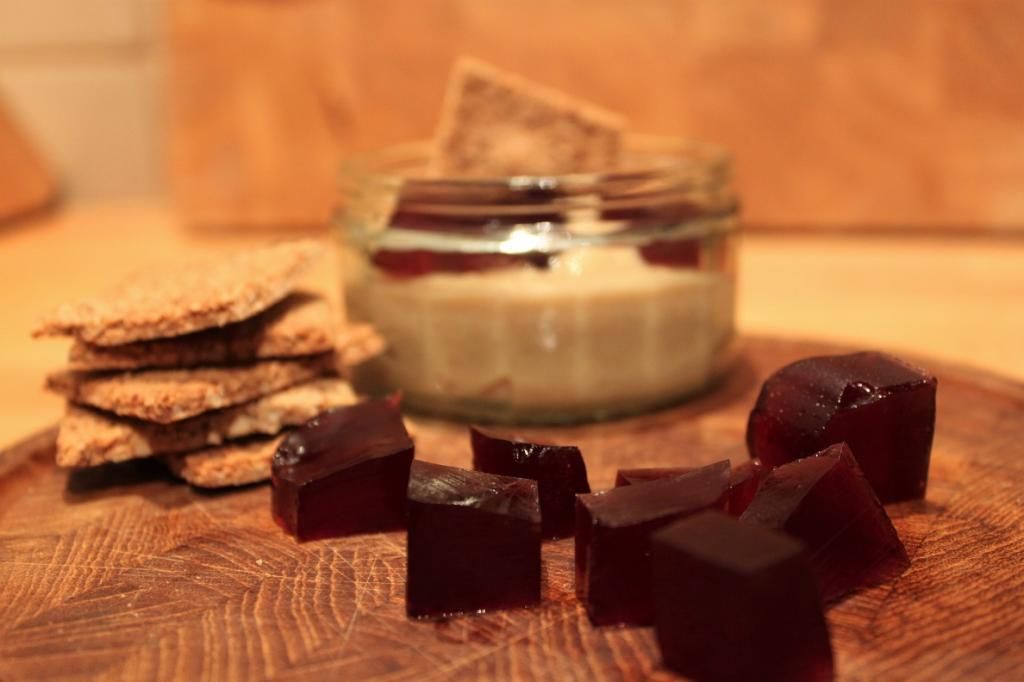
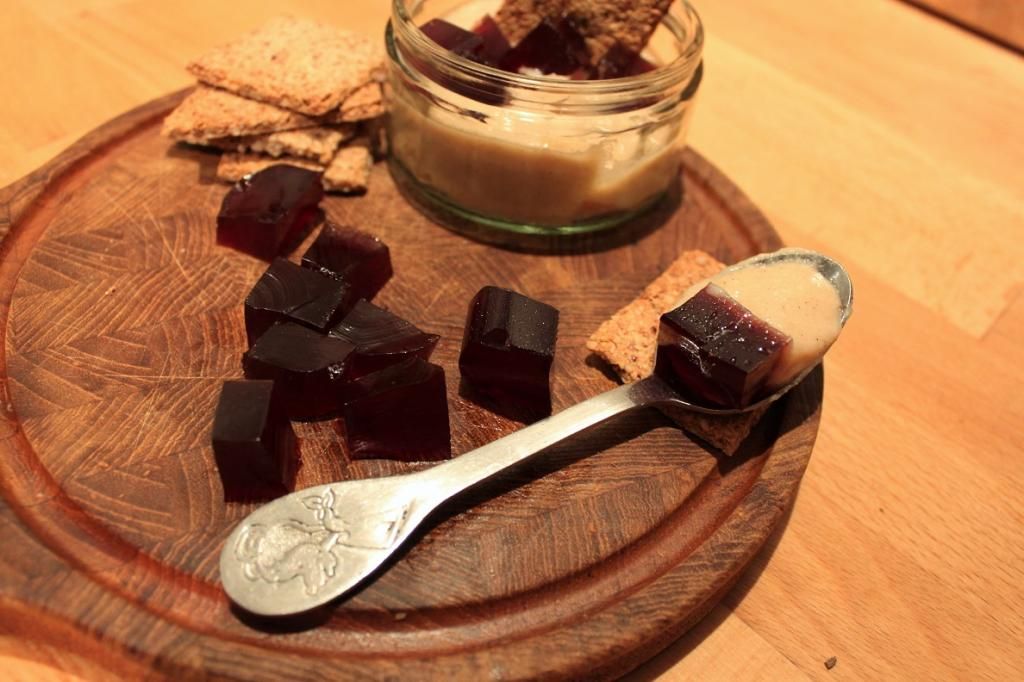
I decided to stick with the elements of my coffee oats and layered based on wanting different textures. So we have two different ‘cookies’, the bottom is a chewy oat and banana cookie – making up the oat and fruit content of my breakfast. The middle is coffee jelly. This idea came from using excess sangria jelly in my granola to delicious effect. And the top is a nuts and seed granola ‘cookie’ to emulate the nutty crunch of my topping on my oats. I threw in some chocolate because…well, why not? My palate is decided not ‘sweet’, especially in the morning, so feel free to customize by adding ¼ cup of sugar to the espresso jelly (I have my long blacks without sugar normally). The honey in the cookies is more than sufficient for me.

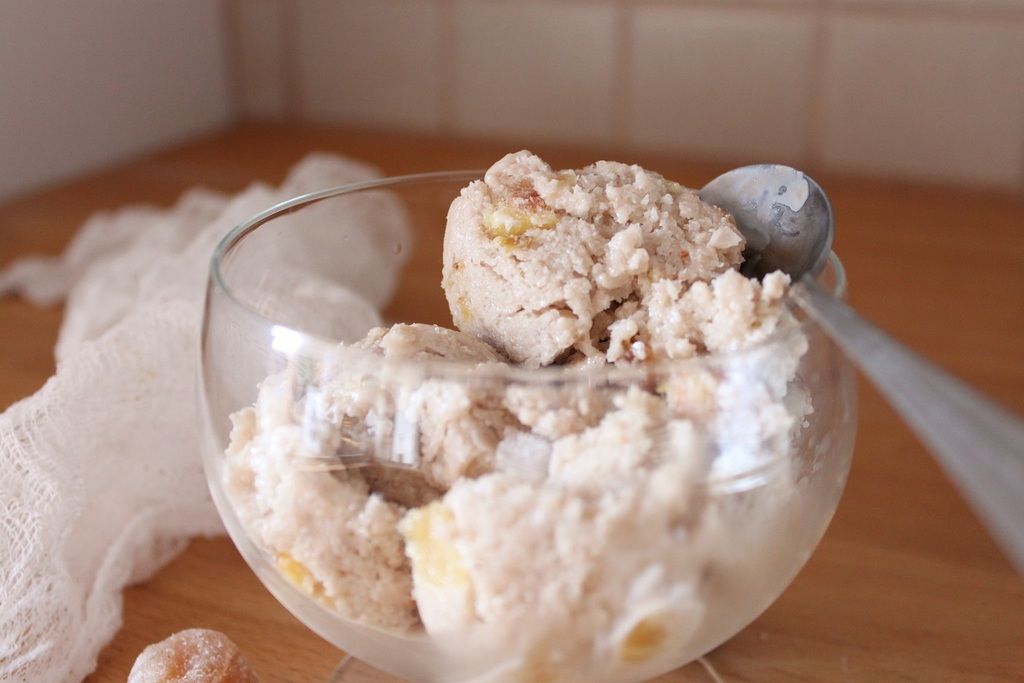
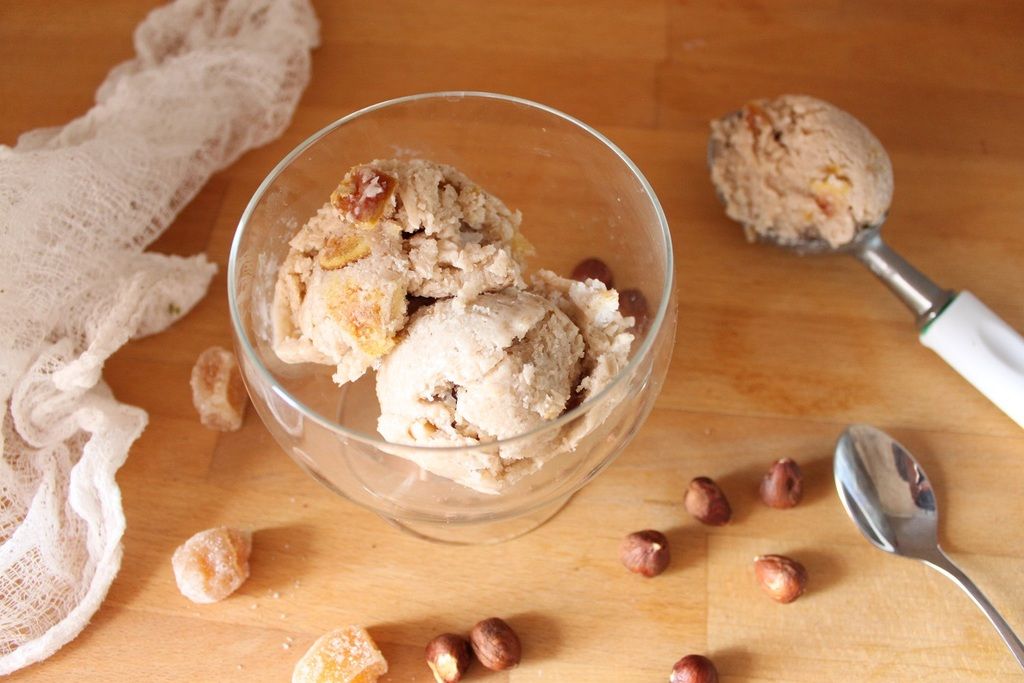
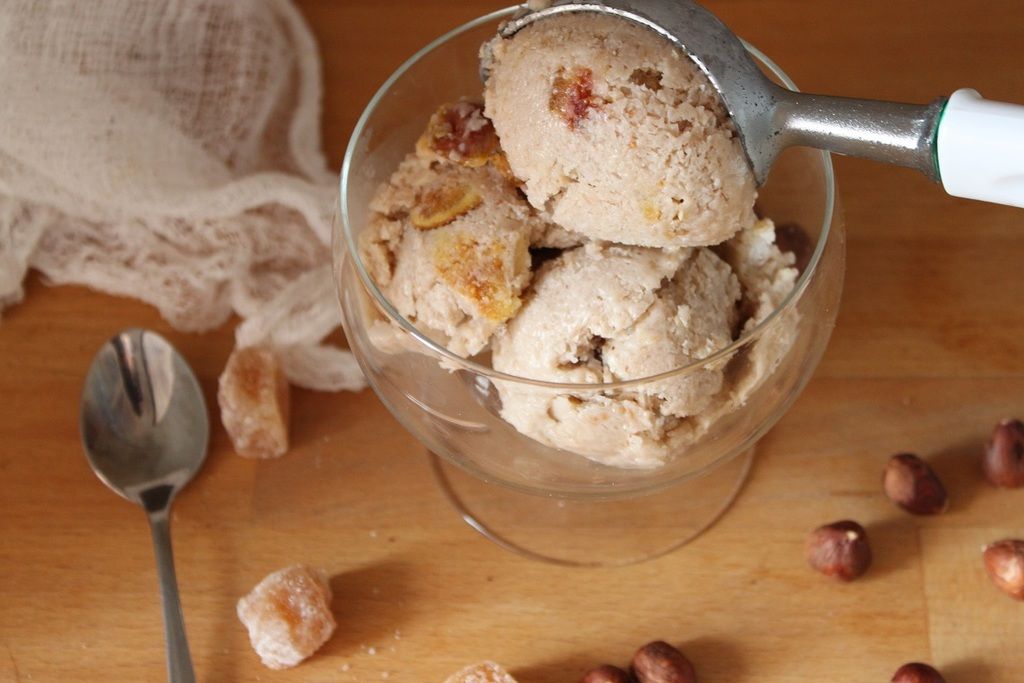
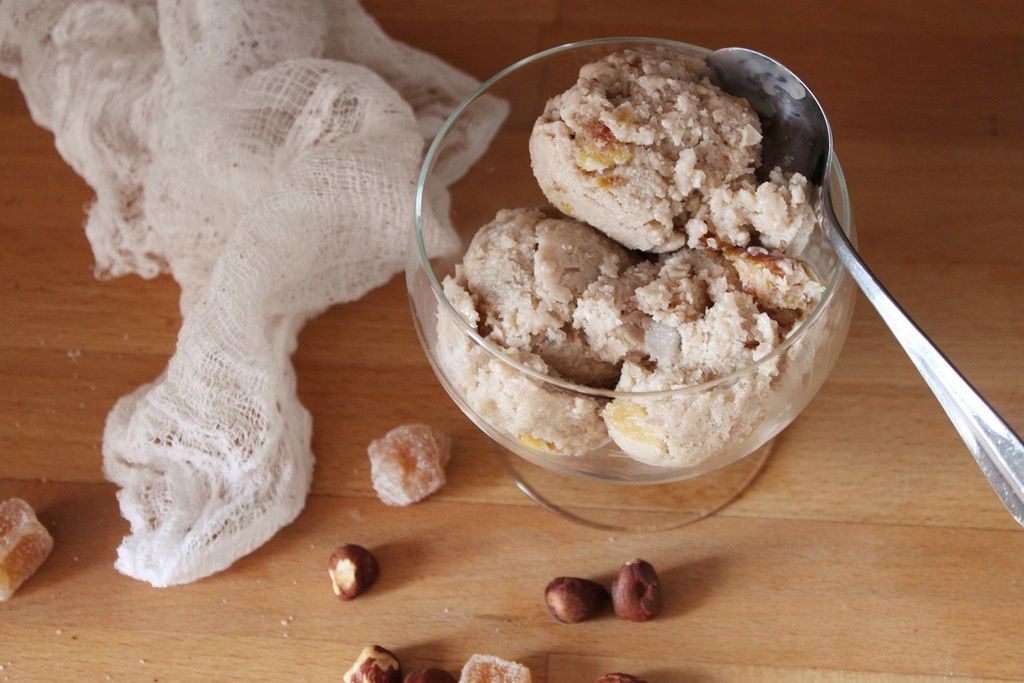
And, if you don’t need the portability, serve with honey whipped ricotta or yoghurt. (Or ice cream!!)

Showing Your Working - Healthy Espresso Jelly Sandwich Breakfast Cookie


Healthy Espresso Jelly Breakfast Sandwich Cookies

(Makes 12 formed cookies)

Espresso Jelly

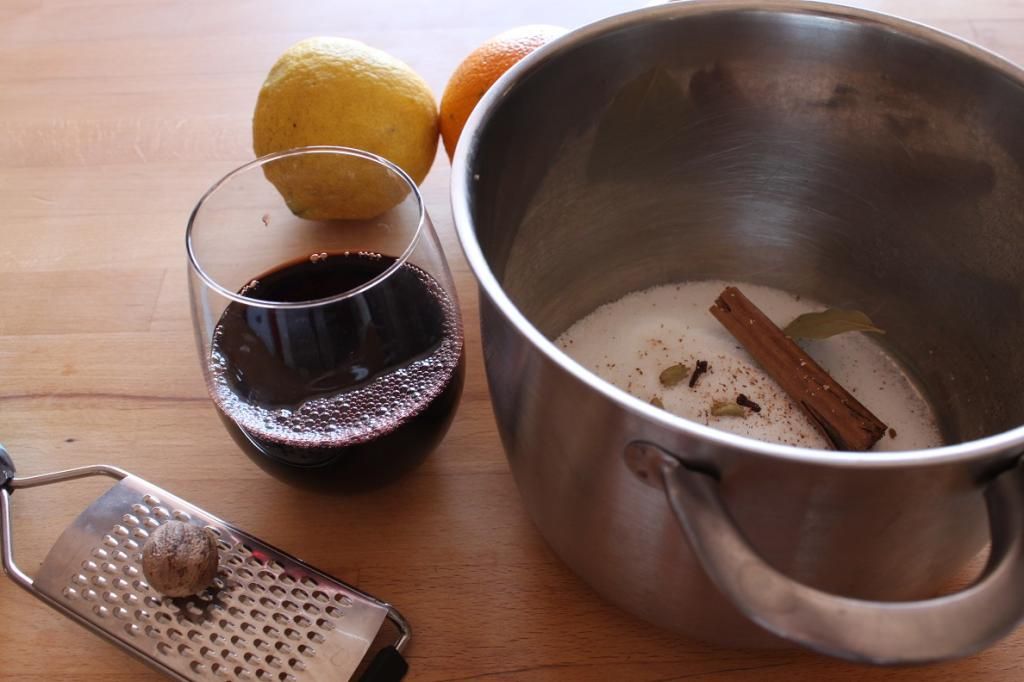
6tbsp ground coffee beans
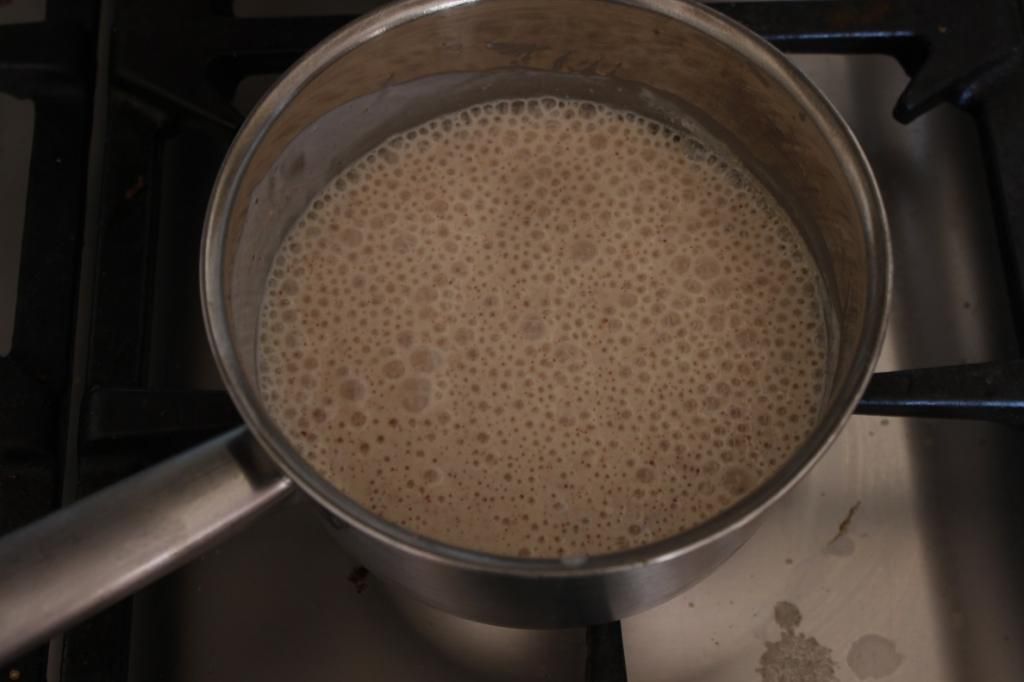
500mL freshly boiled water
5 tsp powdered gelatin


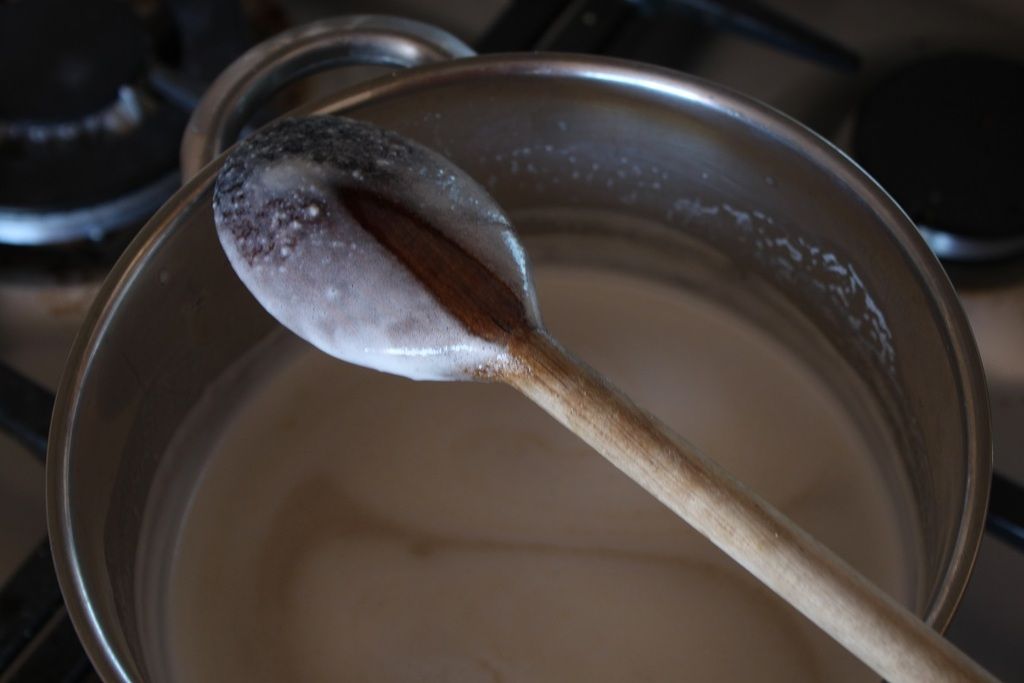
Lightly spray a lamington tin with cooking spray. Put the coffee beans into a plunger and pour over the boiled water. Leave for 5 minutes, then plunge and pour into a bowl. Sprinkle the gelatin over the top of the coffee and whisk in until dissolved. Pour into the lamington tin and put in the fridge to set for at least 4 hours.

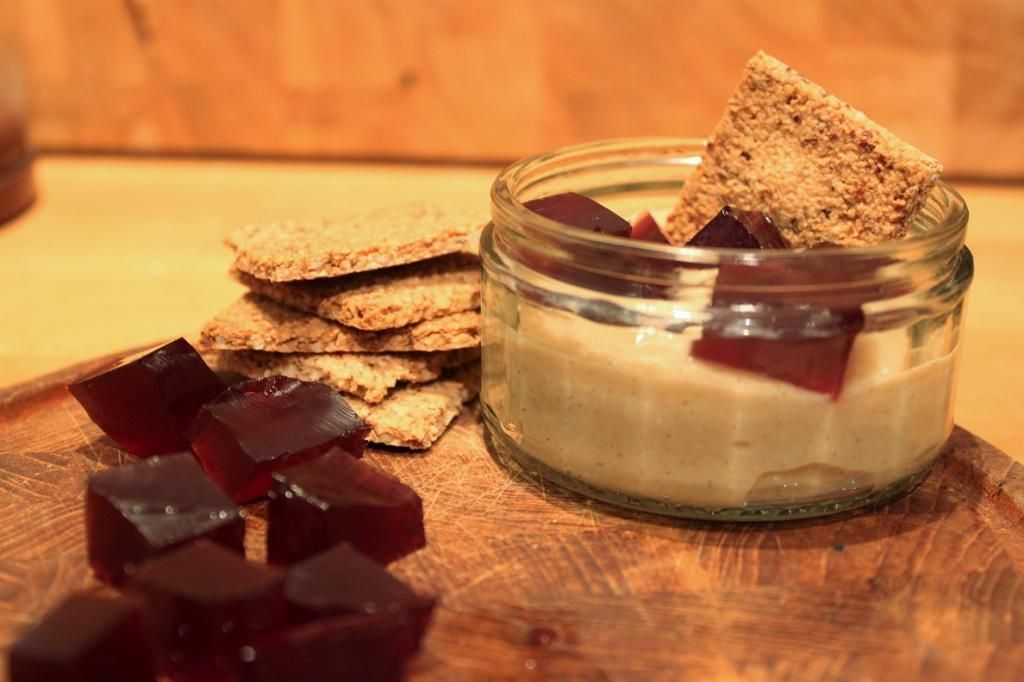
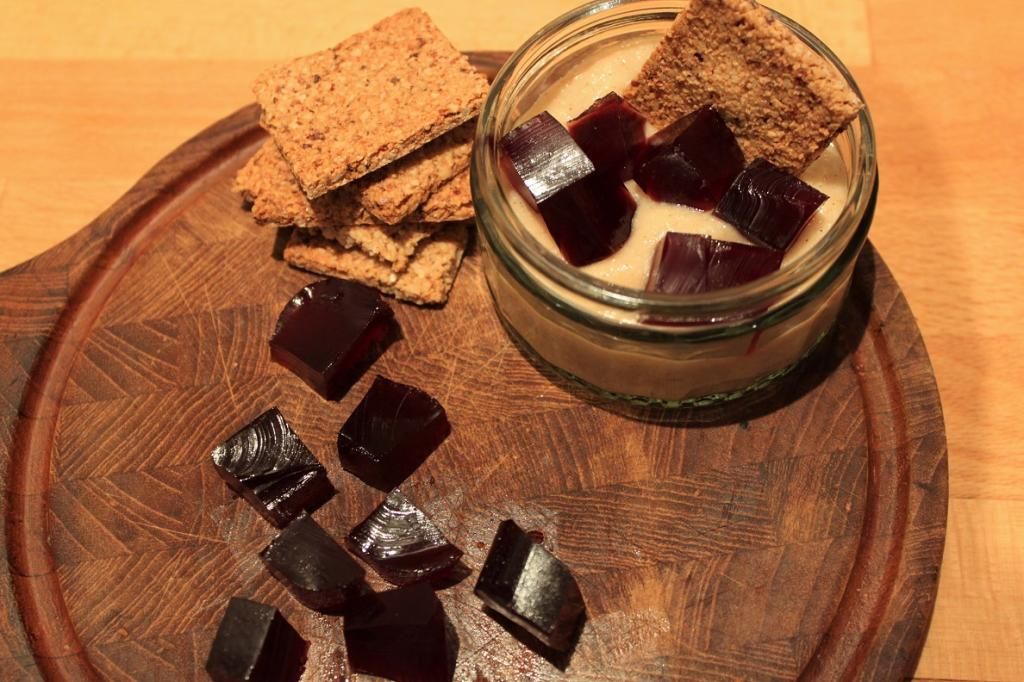
When set, cut into rounds with an egg ring. Chop the excess bits up and serve them with normal oats.

Banana Oat Cookies

3 small very ripe bananas
1 ½ tsp cinnamon
1 tsp ginger
2 tbsp honey
2 tbsp chia seeds
½ cup water
2/3 cup shredded coconut
1 2/3 cup rolled oats


Preheat oven to 165C

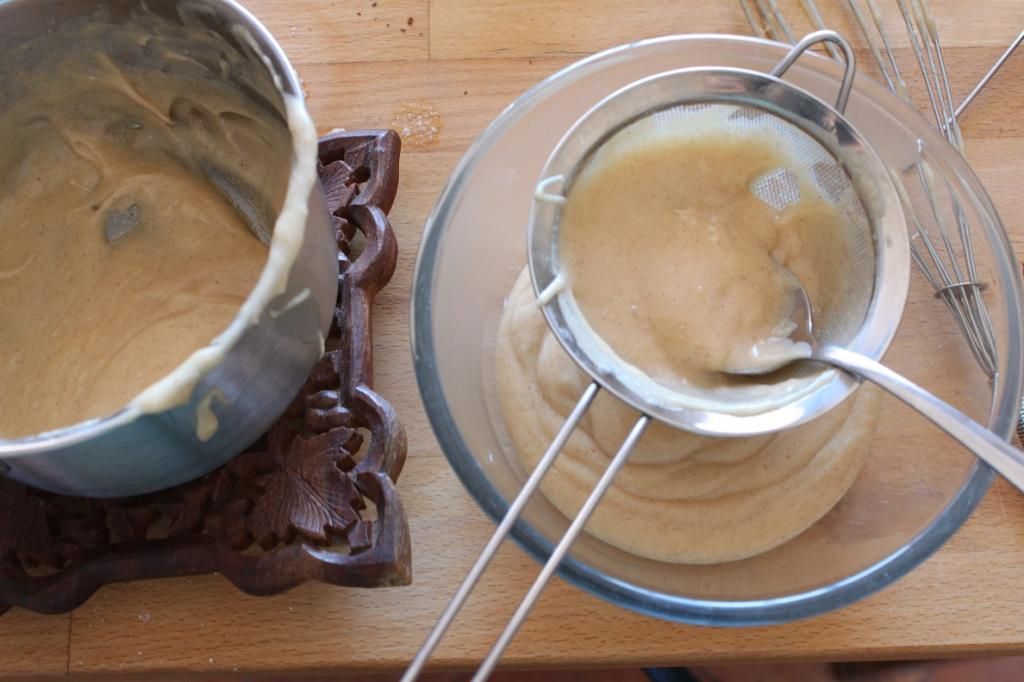
In a small bowl, mix the chia seeds and water and set aside to form a gel.

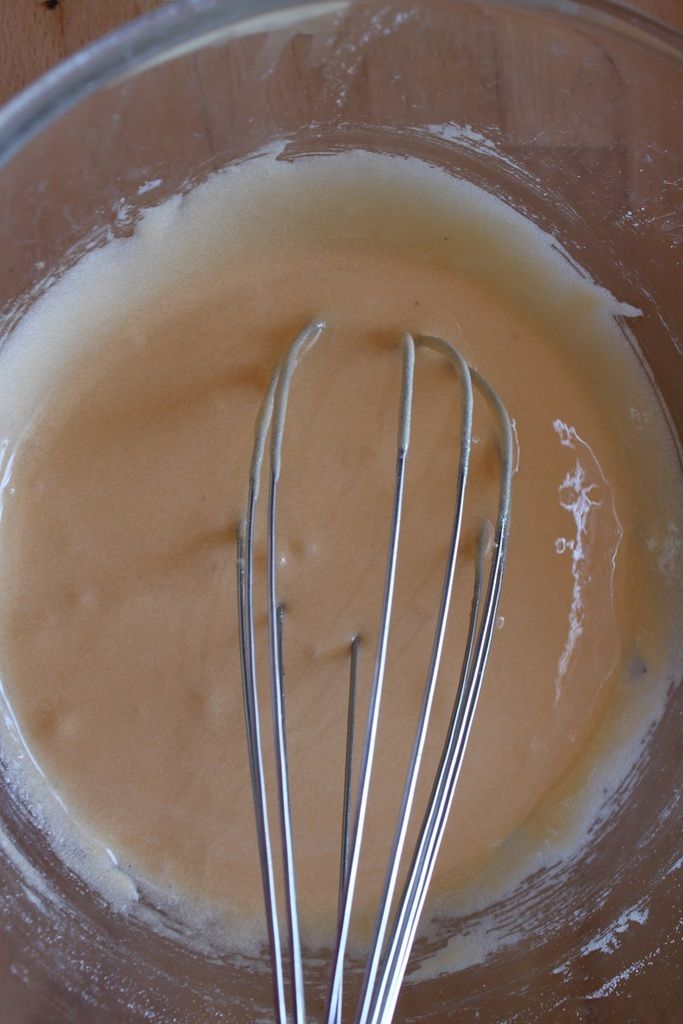
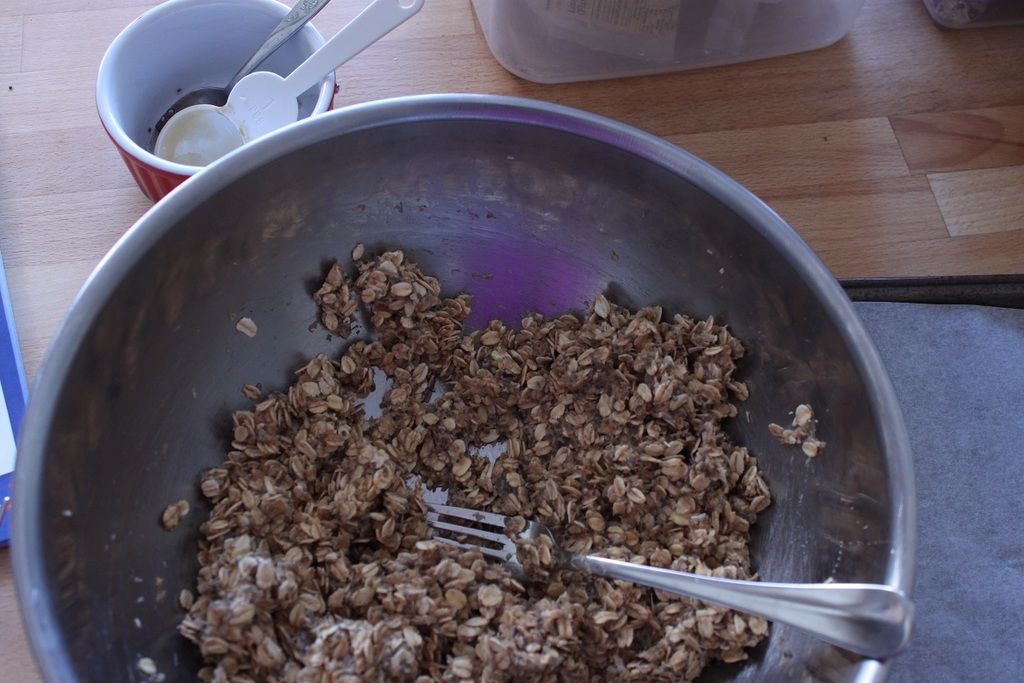
In a large bowl, mash the bananas until smooth, then mix in the spices and honey. Add the chia seed mix, stirring to combine evenly. Then add the oats and stir to coat.

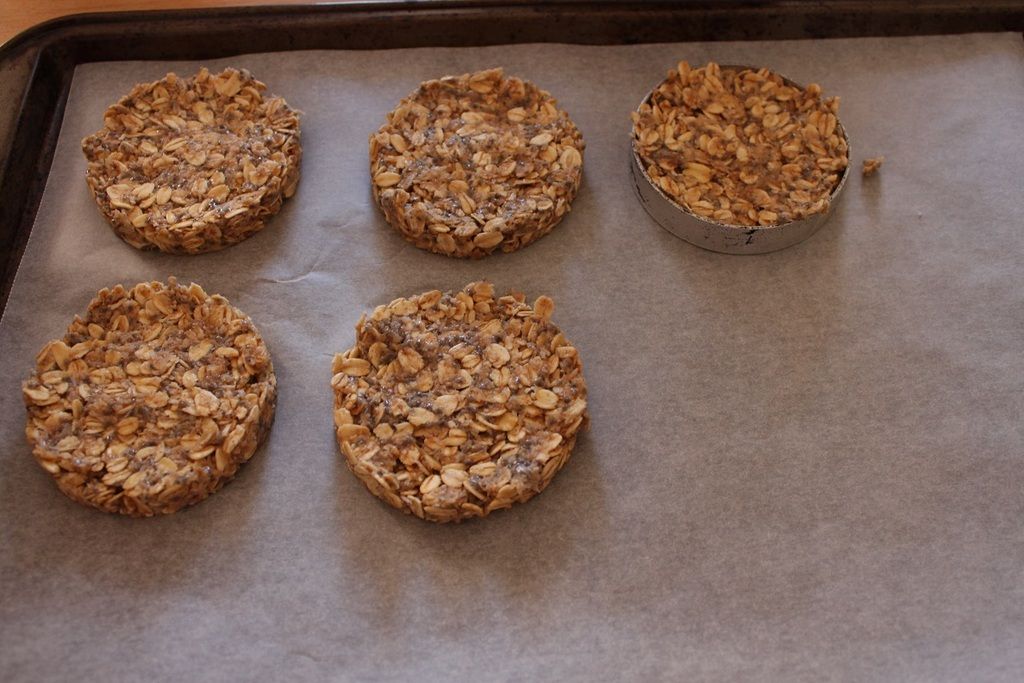
Line a baking tray and lightly grease an egg ring.Place a few tablespoonsful of mixture into the ring and press in tightly with the back of a spoon. Gently lift off the ring, and form the rest of the cookies.

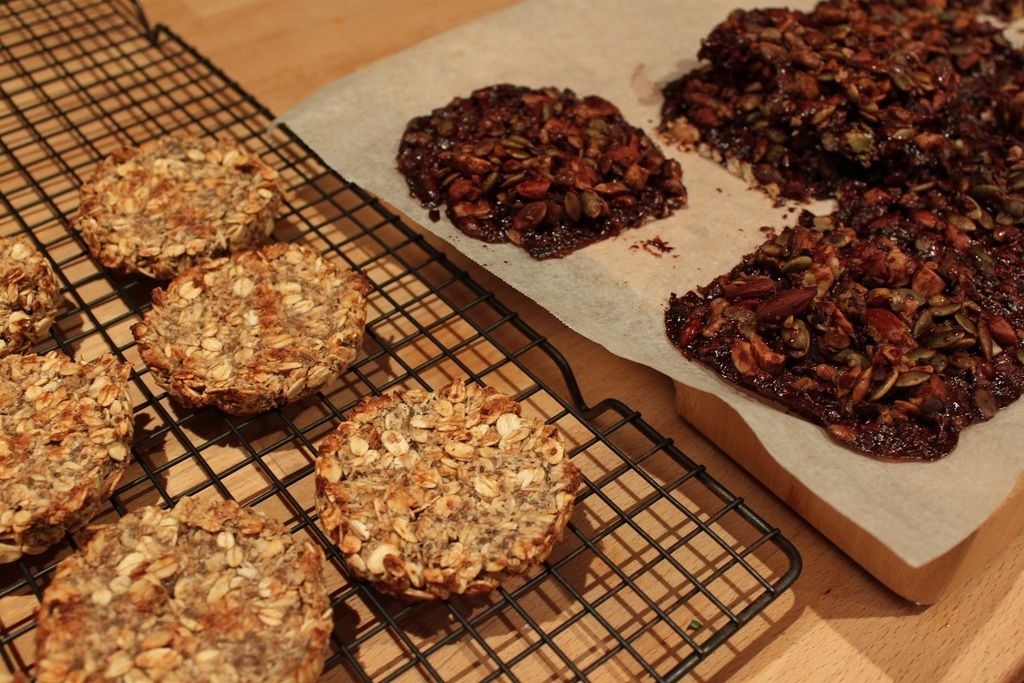
Bake for 10 minutes, or until starting to turn golden on top. Remove, gently flip over the biscuits and bake for a further 10 minutes, until that side is also golden. Cool for 10 minutes on the trays, then on racks.

Showing Your Working - Healthy Espresso Jelly Sandwich Breakfast Cookie
 

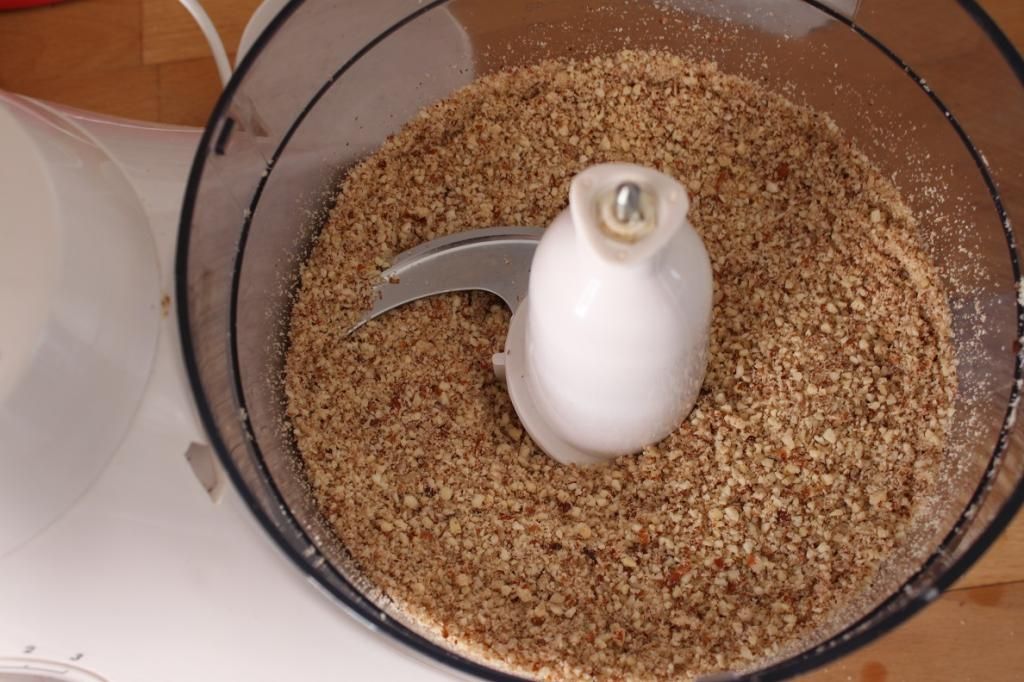
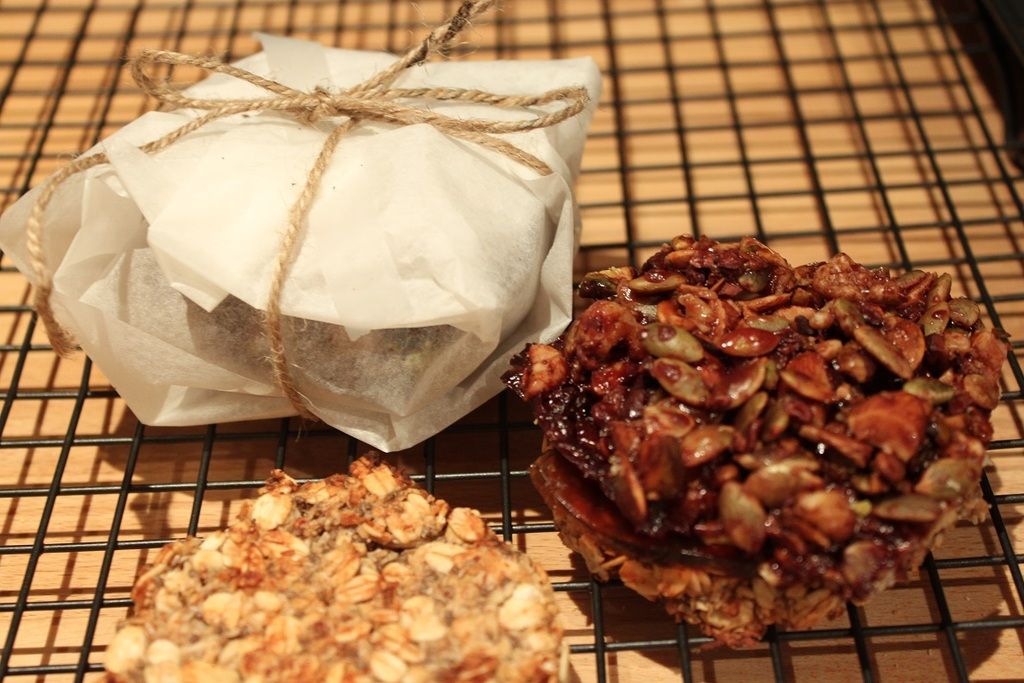
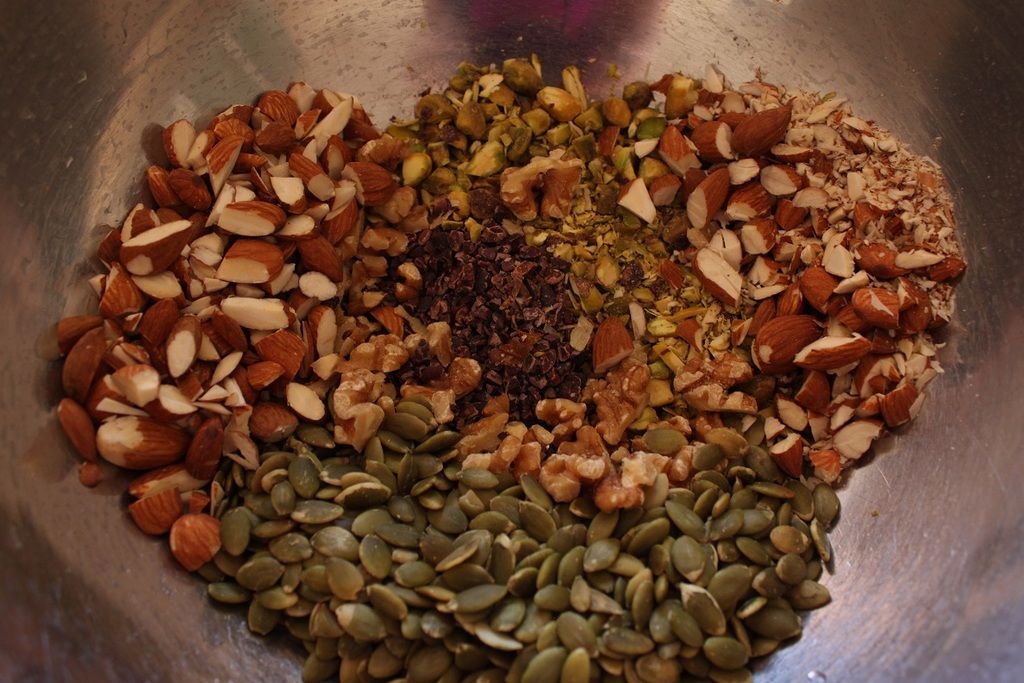
Chocolate Nut Brittle Biscuits

1 ½ tbsp. cacao powder
3 tbsp cacao nibs
1/3 cup pistachios, roughly chopped
1/3 cup walnuts, roughly chopped
1 cup pumpkin seeds
2/3 cup almonds, roughly chopped
1 tbsp vanilla extract
¼ tsp sea salt
1/8 tsp pepper
3 tbsp honey
3 tbsp olive oil

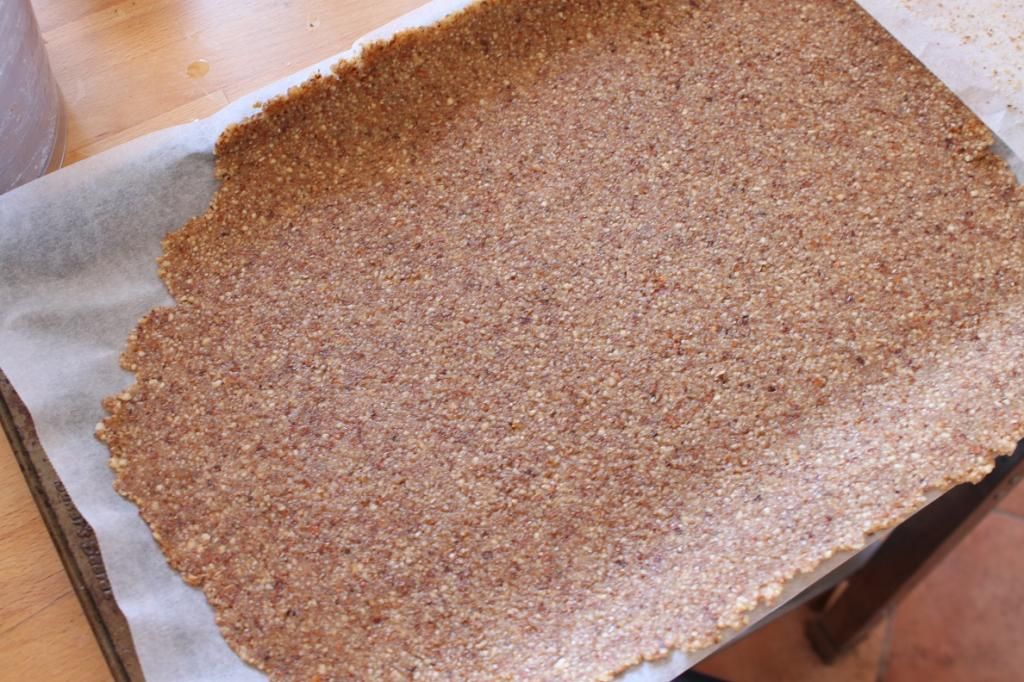
Heat the oven to 165C

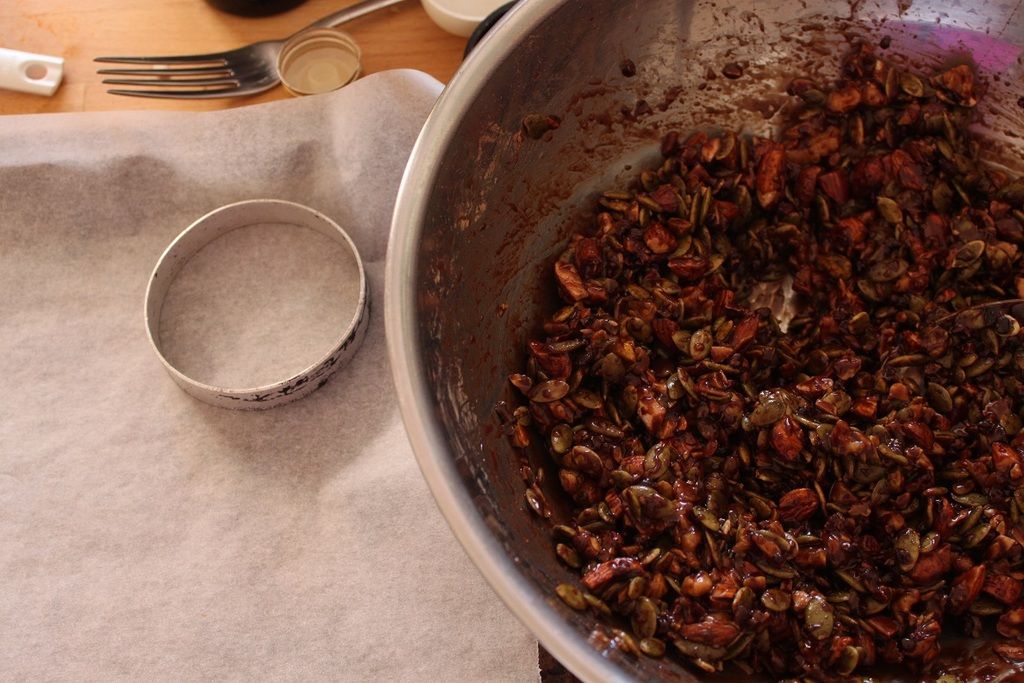
Mix the nuts, seeds and cacao nibs together in a bowl. In a separate bowl, mix the oil, cacao powder, pepper, salt, vanilla, honey and oil. Make sure it is well combined. Pour the nut mix into the wet mix and stir to thoroughly coat everything.

Line a tray with baking paper, and lightly grease an egg ring. Place a few tablespoons of mixture into the ring and press it in tightly, pressing down with the back of a spoon. Gently remove the ring, and repeat for the rest of the mixture.

Bake for 15 minutes, or until caramelised and 'solid'. The mixture will spread a little, but still retain the basic round shape. Cool on the trays. Trim the edges to neaten your sandwiches.

Layer one oat cookie, espresso jelly then a nut brittle cookie on top. If you assemble, wrap and store in the fridge. They will last a few days. The cookies will last up to a week separate at room temperature in air tight containers. Store the jelly in the fridge.

Showing Your Working - Healthy Espresso Jelly Sandwich Breakfast Cookie

Showing Your Working - Healthy Espresso Jelly Sandwich Breakfast Cookie

Monday, March 23, 2015

Dairy Free Delight - Hazelnut Milk Gelato with Roasted Figs and Ginger


Hazelnut Milk Gelato with Roasted Figs and Ginger

Fig season is so frustratingly short, and my supply that was plentiful last year was decidedly less so this year. They’re one of those fruits that I absolutely love – but there’s no way I’d pay $2 each for them. So unless I scam some from a friend with a tree, I go without. Begrudgingly. This year I only really got to make 2 fig dishes – the Brie Cheesecake (Briesecake?!?) and this one. Fig and ginger is a great pairing. Sweet, sticky figs paired with the hot bite of crystalised ginger is a match made in taste bud heaven. As a fancy appetiser, a fig half with a dollop of goat’s cheese, a few slices of crystalised ginger and a little prosciutto is so amazing. Or the same ingredients as a salad with some peppery rocket and maybe some toasted hazelnuts? Fabulous!

I decided to make this as an ice cream because of a competition. It was to win a kick-arse blender, because my one is a little sad and I really want a commercial grade one, without you know, paying for one. You had to answer what dish you would first make with your blender. And my answer was macadamia milk ice cream with fig and ginger. I’m not sure where the idea came from, other than the fact that you need a blender to make nut milks. And to make it more interesting, I turned it into ice cream. And to make it more exciting, I added fig and ginger. I didn’t win the blender, but I did win because I dreamed up an awesome ice cream. I swapped to hazelnuts because macadamias were more expensive at the time, and I’m quite a big fan of hazelnuts. Use the leftover hazelnut pulp to make protein balls, or dry out and use as a meal in baking.
Hazelnut Milk Gelato with Roasted Figs and Ginger
Hazelnut Milk Gelato with Roasted Figs and Ginger 

Hazelnut Milk Gelato with Roasted Figs and Ginger

Hazelnut Milk Gelato with Roasted Figs and Ginger

(makes about 1L)
1 cup raw hazelnuts
4 cups water (1L)
6 egg yolks
200g caster sugar
8 small figs, halved
Honey
50g crystallised ginger, roughly chopped

Soak the hazelnuts for 4 hours (or overnight) in the water. Blend well, then strain through cheesecloth or a clean chux to separate the ‘milk’ from the pulp.

Bring the hazelnut milk to a simmer over medium heat in a saucepan (do not boil, or it will separate). In a separate bowl, whisk the egg yolks and sugar together until pale and thickened, at least 2 minutes. Pour the hazelnut milk into the egg mix in a thin stream, whisking as you go. When completely combined, pour back into the saucepan and cook, stirring for around 5 minutes, or until it thickens and coats the back of the spoon. Strain into a clean bowl, cover with plastic wrap and refrigerate until completely cold.

Brush each fig half with a little honey on the cut side and pop on a tray in a 160C oven, roasting until softened and caramelly. Remove and allow to completely cool.

Churn according to your ice cream maker's instructions, then freeze in an airtight container for a further 2-4 hours to firm up
Hazelnut Milk Gelato with Roasted Figs and Ginger

Hazelnut Milk Gelato with Roasted Figs and Ginger

Sunday, March 1, 2015

Secret Cake Club (Take Two) - Profiteroles with Camembert Creme Patisserie


Secret Cake Club (Take Two) - Profiteroles with Camembert Creme Patisserie


So, given that I don't bake a huge amount, I decided to bake a few things to take to the French Secret Cake Club. Just in case my cheesecake was a massive fail. It wasn't, but I still decided to take my back-up dish as well. Having a whole batch of profiteroles in the house just for Lance and I is never the best idea in the world.

My second French dish is an actual French pastry, with a Skamp-twist. Again, I stuck with the cheese theme, and made a Camembert Creme Patisserie to fill my profiteroles. Fragrancing it with a touch of cardamom and drizzling some dark chocolate ganache over the whole affair.

I remember my nanna making choux pastry when I was little. I didn't know back then that it WAS choux pastry, I just remember it being crazy. Pastry, cooked in a pot? What!? Then when it's baked it turns into Chocolate Dog Bones! Or at least, that's what my brother used to call Eclairs. Then when I was in my early twenties the croquembouche as birthday cake and wedding cake really took off in Perth. I know some people were paying $3.50 per profiterole on the cake, and I automatically assumed that must mean that it was difficult to make a profiterole. I know my nanna used to be a great cook, so it made sense that it was something she'd practiced and perfected. Turns out, profiteroles are actually easy. Like, really easy.

The way the pastry is made requires a little elbow grease, but it comes together pretty simply. Boil the water and butter. Stir in the flour. Cool briefly, stir in the eggs. The hardest part is that the eggs won't immediately want to combine, but they do with a bit of stirring. It takes around 5 minutes of stirring with a wooden spoon. The water in the dough does the rest of the work for you, puffing up the balls into lovely airy pillows.

Make the filling first, so it can cool.


Camembert Creme Patisserie

1 3/4 cups milk
3 cardamom pods
80g camembert, rind removed and chopped
3 egg yolks
1/3 cup caster sugar
1/3 cup + 2 tbsps corn flour, sifted

Warm milk and cardamom pods until a simmer, and add the camembert pieces, stirring to melt the cheese. Whisk yolks and sugar together in a bowl. Add the flour and whisk well.

Sieve the milk to remove the pods and any unmelted lumps of cheese. Pour over the egg mix in a thin stream, and whisk to combine.

Return the whole mix to the saucepan over a medium heat and stir for 5 minutes, until mixture thickens. Pour into a glass bowl and cover surface with plastic wrap. Cool in the fridge.


Secret Cake Club (Take Two) - Profiteroles with Camembert Creme Patisserie
Secret Cake Club - Profiteroles with Camembert Creme Patisserie


Profiteroles

(makes about 24)
100g butter, softened
1 cup water
1 cup plain flour
4 eggs

Preheat  oven to 200C

Combine butter and water in a large saucepan and bring to a boil over high heat, stirring to melt the butter.

Add the flour in one go. Stir with a wooden spoon to incorporate fully and continue beating mixture until it pulls away from the side of the pan. Remove from heat and set aside to cool 5 - 10 minutes.

One by one, beat the eggs into the mixture. Making sure the first egg is fully incorporated until you add the next.

If you'd like you can pipe the balls, but I just form balls with 2 tablespoons, rolling a bit of dough between the two, then placing on baking paper lined trays. Should make around 24 balls. Sprinkle a bit of water on the trays.

Bake for 15 minutes without opening the door. Then remove, pierce the bottom of each one with a knife or skewer to remove steam. Lower the oven temperature to 170C then bake an additional 5-10 minutes  until golden and dry.

Cool on wire racks before piping the filling in through the hole you made with the knife earlier.

Chocolate Ganache

50mL cream
100g dark chocolate, chopped

Heat the cream in a small pot to a simmer. Take off the heat, and drop the chocolate over the top. Let stand 30 seconds, then stir to a smooth mix. Drizzle over the top of your profiteroles.


Secret Cake Club - Profiteroles with Camembert Creme Patisserie

Secret Cake Club - Brie Cheesecake

Secret Cake Club - Brie Cheesecake with Red Wine Caramel Figs

My first foray into cooking was through baking. I used to help mum bake biscuits and cakes all the time when I was little, then when I was old enough, I was off and running doing it by myself. I'd generally work my way through a well-used copy of the Australian Women's Weekly Big Book of Beautiful Biscuits. It remains one of my favourite baking books with simple, no-fail versions of a lot of classic cookies. I have yet to meet a better ANZAC biscuit recipe! As I got older and other things got in the way of baking as a hobby, my cookies skills were stretched in a more 'practical' way and meals have become my focus. But I still love baking, I just don't do it as often. And as such, I haven't experimented as much. I'm more a special occasions baker. Realistically, I'm more of a baked-goods eater, than a baker!

After hearing about the Secret Cake Club, I knew it was something I wanted to get involved in. It was the perfect excuse to get my bake on, and dust off some skills. The theme for the one I scored a place in was French. Now, everything I know about French baking is that it's notoriously 'finicky'...and that it's delicious. People get extremely passionate about their patisseries and I wanted to make something worthy of the theme, and the event. I didn't have time to learn the secrets of a perfect macaron foot. And I didn't want to splurge and buy myself Madeleine or financier trays. And the only French things I've had experience with - souffles and French Toast - are best served immediately (although someone brought a French Toast that was fantastic!)

So, me being me, I thought I'd go a little bit out of the box and bake something "French", rather than a traditional French baked good that I probably wouldn't do justice. So, what's French? For me, that's cheese and wine. Specifically, soft cheeses like Brie and Camembert. And red wine, like a Cab Sauv, or a Burgundy. The idea for a French Cheese French Cheesecake was borne. It just needed a little fleshing out.

One of my other left-field ideas was to use French Lentils as my "Frenchness". I toasted (on a tray in an 165C oven for around 10 minutes) and ground some lentils into flour to experiment with and found they gave a lovely nutty flavour, but made for the crumbliest of biscuits. A little bit of reading informs me that pulse flours need to be used in combination with other flours because of the lack of gluten, and some arrowroot powder will help it 'stick' and bind together. Voila! Perfect. I changed a simple Sables Breton into an even more French Biscuit by adding French Lentils. The cheesecake was bake on top, and the crowning glory comes from Cabernet Sauvignon Caramel Figs. Traditional French? No. Skamp's French? Totally!

Secret Cake Club - Brie Cheesecake with Red Wine Caramel Figs

French Lentil Sable Breton

makes a 23cm cheesecake -serves 10-12
(adapted from Gourmet Traveller)
240g butter, softened
6 egg yolks
260g caster sugar
1/2 tsp ginger powder
105g french lentil flour
10g arrowroot powder
115g plain flour
2 tsp baking powder

Preheat oven to 165C. Line the bottom of a 23cm springform cake tin with baking powder and lightly grease the tin. 

In a small bowl with a handbeater,beat the butter until very fluffy and pale. This will take around 3 minutes. In a standmixer, whisk the egg yolks until creamy, slowly adding the caster sugar until it's all combined. Beat until this is also very light and fluffy. Add the butter in 3 batches, beating until smooth. Then beat in the ginger.

Turn the beater off, then sift the flours and baking powder over the top, then fold until just combined. Spoon the batter into the tin and smooth down the top. Baked until golden and puffed, around 25 minutes. Set aside to cool completely in the tin.

Secret Cake Club - Brie Cheesecake with Red Wine Caramel Figs

Brie Cheesecake

350g cream cheese, at room temperature
350g Brie cheese, at room temperature, rind removed.
4 eggs
1/2 cup cream
1/3 cup sugar

Preheat oven to 165C

In a medium bowl with a handbeater, beat the brie until light and fluffy. This will alter in time, depending on the softness of the brie you bought, but it could take a few minutes.

In a standmixer, beat the cream cheese with the sugar until smooth and fluffy. Beat in the brie, then the eggs and cream. Make sure it's well-combined, but don't over beat because the cheese can separate.

Pour the cheesemix over the sable breton base and tap the container on your counter a few times to remove air bubbles.

Fill a roasting tray with boiling water and place it on the bottom rack of the oven. Pop the cheesecake on the middle rack. Bake for 30-40 minutes or until set with a tiny amount of jiggle in the centre.

Set aside to cool to room temperature

Secret Cake Club - Brie Cheesecake with Red Wine Caramel Figs


Cabernet Sauvignon Caramel Figs

150g sugar
1/4 cup water
2 tbsp Cabernet Sauvignon red wine
1 tsp water
6 figs, sliced into quarters

In a small saucepan, heat the sugar and 1/4 cup of water over medium heat. Stir until the sugar dissolves, then leave it to boil and become a lovely caramel colour. Stir via shaking the handle here and there to keep the liquid moving. And brush any sugar crystals that form down with a wet pastry brush.

When caramel coloured, very carefully add the red wine and extra teaspoon of water. It will fizz and spit at you. Stir through and mix until smooth. Using two forks, drop the fig slices in the caramel, then place on the cake. Drizzle the remaining caramel over the top. You can briefly reheat the caramel over a low heat if it starts getting too solid.

Serve!

Secret Cake Club - Brie Cheesecake with Red Wine Caramel Figs


Tuesday, February 10, 2015

Sweets for your Sweet - Buttermilk Pudding with Sangria Jelly and Nut Wafers

Buttermilk Pudding with Sangria Jelly and Nut Wafers
Do you celebrate Valentine’s Day? We don’t. Not really. I’ve never been a flowers and chocolates and teddy bears with hearts kinda girl. But I do love love, and Lance and I are romantic just in general, so I’m all for people taking the opportunity to tell that special someone that you love them. Lance and I are actually going to a comedy show for the Fringe Festival on Valentine’s Day. But we’ll have a nice dinner beforehand. Not sure what yet. All I know is that this is our Valentine’s Day dessert. It’s a little different, a little quirky and is most importantly, a little bit lighter and not too sweet in this summer heat! As an added bonus the components are made early(ish) with chilling time, or can be made a day or so in advance and assembled before serving, making it great for dinner parties. Or romantic dinners, where less cooking time means more couple time!
I am a huge fan of sangria. And buttermilk. And nuts. So this dessert is a combination of all of those things. Luckily, Lance is too – so it can feel like I’ve made it for him. Each element here has a small level of sweetness, which combine for a lovely dessert with a fun play on textures – without overwhelming you with sweetness. The buttermilk pudding is smooth and creamy, the sangria jelly has a little chew – not quite jube, but a bit denser than a normal jelly. Add the crunch of the nut wafers and you’ve got a party going. They, by the way, are the easiest crackers to make. And so delicious!
The jelly and wafers make more than you need for the buttermilk pudding portion, but the crackers in particular are so moreish that you won’t find a problem eating the rest of those by themselves! But they both make the best addition to a cheese platter. And I might’ve had some of the jelly with my breakfast granola. And it might’ve been absolutely delicious!


Buttermilk Pudding with Sangria Jelly and Nut Wafers


Sangria Jelly

500mL dry red wine (such as Cab Sauv, or Shiraz)
50 gm caster sugar
8 gelatin leaves
Juice and peel of one orange (peeled in large strips)
Juice and peel of one lemon (peeled in large strips)
2 bay leaves
2 cardamom pods
4 cloves
1 stick cinnamon
Lightly oil a shallow rectangular dish that can will hold 500mL and set aside until required. In a medium pot, bring red wine, sugar, citrus juice and peel, and spices to a simmer and stir to dissolve sugar. Set aside for the flavours to infuse for an hour. Strain through a fine sieve into a clean pot and bring back to a simmer. Place the gelatin into a bowl of cold water and leave to soften. When the wine mixture comes to a simmer, squeeze excess water from the gelatin and gently drop into the wine. Stir to dissolve the gelatin then set aside for 15 minutes to cool slightly.
Gently pour the jelly into the prepared container and refrigerate until set – around half an hour. When ready to serve, turn out of container, and cut into small cubes.
Buttermilk Pudding with Sangria Jelly and Nut Wafers

Buttermilk Pudding

(makes 4 serves)
1tsp vanilla bean paste
1/2 teaspoon ground cinnamon
1 1/2 cups buttermilk
3 egg yolks
1/2 cup caster sugar
2 tablespoons corn flour
Combine the vanilla bean, cinnamon and buttermilk in a medium saucepan over medium heat. Cook, stirring, for 5 minutes or until mixture is almost at a simmer. You want it to come to temperature very slowly, so the buttermilk doesn’t separate. It’s much more temperamental when heating than normal milk.
Whisk egg yolks, caster sugar and corn flour in a bowl. Slowly pour the milk into the egg mix whilst whisking. Once it’s all combined, pour into a clean saucepan and put back over medium heat. Cook, stirring, for 4-5 minutes or until mixture thickens. Strain through a fine sieve into a container with a spout, then pour into your desired serving vessels. Tap onto the counter to get rid of air bubbles. Wrap with cling film and pop in the fridge to chill and set, at least an hour.
Buttermilk Pudding with Sangria Jelly and Nut Wafers

Hazelnut and Almond Wafers

¾ cup almonds
¾ cup hazelnuts
3 heaped tablespoons brown sugar
Zest of one orange
¼ tsp ground cardamom
2 egg whites
Preheat oven to 180C
Put the almonds and hazelnuts into the bowl of your food processor and pulse until broken up into tiny pieces. You want mainly ‘meal’ texture, but a few bits a little larger is fine. Add the brown sugar, cardamom and orange zest, and pulse to mix. Add the egg whites and pulse until it comes together in a ball. It’ll be fairly sticky.
Lay out a piece of baking paper the size of your baking tray, put the ball of dough on it, then place another piece of baking paper over the top. Roll the dough out evenly, and thinly (around 2mm) to spread across the size of your whole baking tray. Carefully peel off the top layer and put in the oven.
After about 10 minutes, it will have dried fairly considerably and will have turned paler in colour. Remove from the oven and cut into squares/rectangles with a pizza cutter or sharp knife (pizza cutter is a much easier and neater way of doing it). Place back in the oven for another 10-12 minutes or so until golden. The pieces will have shrunk away from each other and formed individual wafers. Watch them carefully this second time as they can burn easily.
Set aside to cool on the tray and finish drying out for half an hour before putting on a cooling rack to cool completely. Store in an airtight container.

Assemble the three components however you artistically like!

Buttermilk Pudding with Sangria Jelly and Nut Wafers