Showing posts with label breakfast. Show all posts

Wednesday, March 19, 2014

Restaurant Inspired - Sweet Potato and Coconut Gnocchi with Cashew Basil Crema


I recently had a lunch date with my husband at Solomon’s CafĂ© in Highgate. It was on the to-visit list for a while and the menu item that most put it there was the famed sweet potato and coconut gnocchi. When we got there, we ordered out meals with a side of sweet potato and coconut gnocchi. And we were told…it’s actually beetroot gnocchi now. They haven’t been able to source any organic sweet potatoes for a while, so they’ve had to amend it. The whole restaurant is organic (and gluten and dairy free), so obviously this is an issue for them. And the gnocchi was soooo good. Everything was delicious, but the gnocchi was definitely the stand-out.

The next morning I was trying to work out what to make for breakfast. The idea of toast wasn’t thrilling me, so in spite of telling Lance that I was going to make some form of ratatouille with the almost-too-ripe tomatoes in the fridge…I wasn’t really in the mood. So I still made the ratatouille (which we had for lunch), and I thought I’d give the sweet potato gnocchi a go.

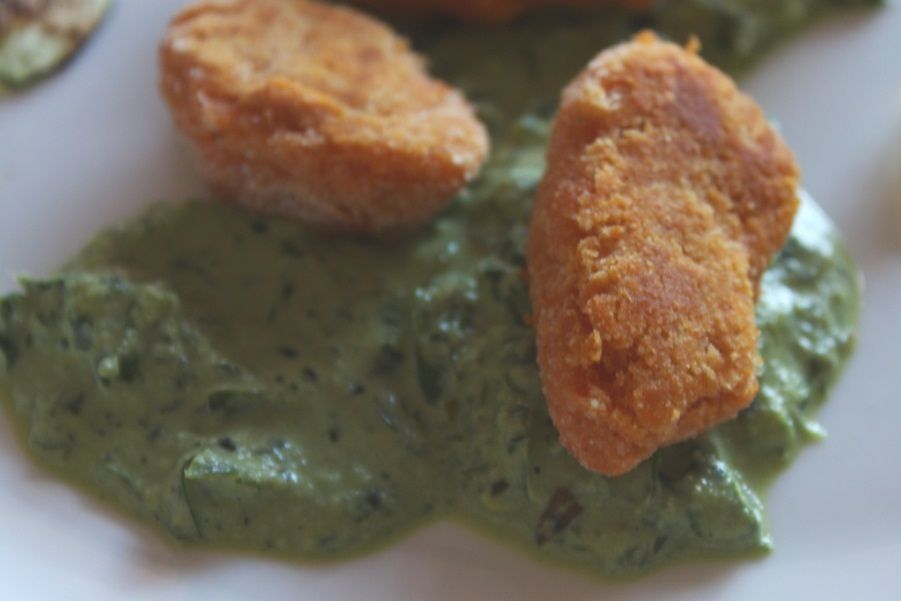
This isn’t gnocchi in the traditional boiled pasta route, I just fried the pieces until crispy. And I already had some 
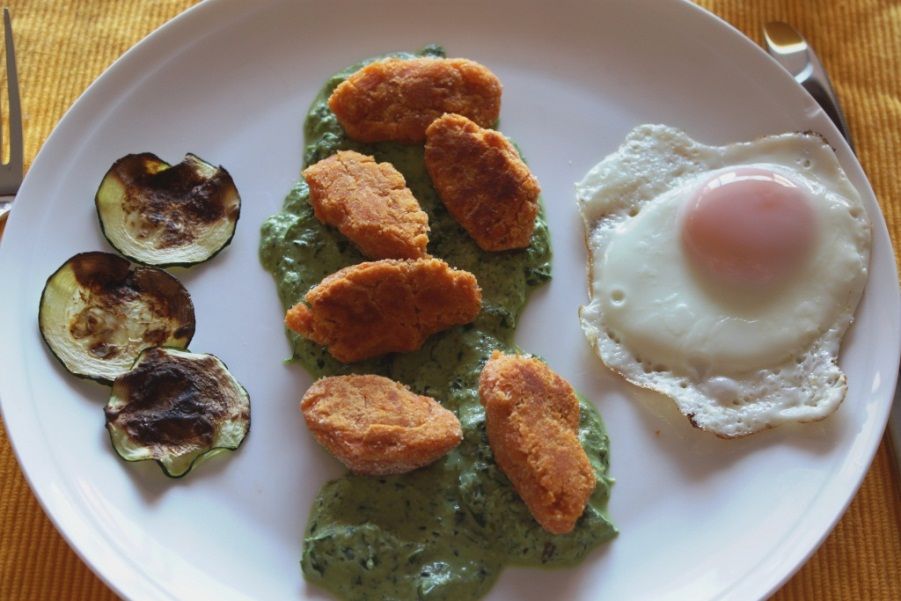
cashews soaking, so I made a kale, basil and cashew crema to go with it. To make it more breakfast-y, I served it with an egg and a few zucchini chips as more of a garnish. To keep the dish quick, I microwaved the sweet potato instead of roasting it.

All in all, not a bad breakfast – and it all came together before 8:30am! Unfortunately, it was too early for me to bother with many photos, so there’s only a couple of the finished product.

Sweet Potato and Coconut Gnocchi with Cashew Basil Crema.
(serves 2)
1 medium sweet potato
3 tbsp coconut flour (depending on how big your sweet potato is)
Pinch sea salt
Pinch black pepper
pinch cinnamon
¼ tsp sweet paprika
Coconut oil for frying.

2 handfuls cashews, soaked overnight
2 tbsp honey
1 tbsp apple cider vinegar
3 kale leaves, stripped off the rib
Big handful basil
Big handful parsley
¼ tsp sea salt
¼ cup olive oil
Water for thinning

Prick the sweet potato a few times, put in a glass bowl, cover with a piece of paper towel and microwave for around 6 minutes until soft. Set aside to cool.

In a food processor, blend the all the ingredients except the olive oil and water. Pulse at first, scrape down the sides, then run on low, adding the oil and water to reach your desired consistency. Check for seasoning and adjust as necessary.

When the sweet potato is cool enough to handle, peel and discard the skin. Mash well with a fork. Add the salt, pepper, cinnamon and sweet paprika, and mix through with the fork. Add coconut flour 1 tbsp at a time until it makes a dough. I only needed 3 tbsp for my sweet potato.

Scoop teaspoonsful of dough and roll into gnocchi shapes, flatten slightly with the tines of the fork to shape.

Heat a nob of coconut oil in a fry pan to medium high heat. Fry the gnocchi pieces for a few minutes until golden – around 3 minutes, then flip over and cook that side. Don’t crowd the pan. I did mine in 2 loads, moving the first to a plate in the microwave to keep warm.

Drizzle the sauce onto your serving plates, then top with sweet potato gnocchi.

Serve with an egg if you’d like.
 

Thursday, January 9, 2014

Breakfast of Champions - Coffee, Oats and Yoghurt

I think I’ve mentioned in a few posts that I have been aiming to be healthier. Over the past few years, I have lost a fair amount of weight, and I have been asked numerous times what it is that I’m “doing”. I kind of dislike labelling the way I eat because it automatically adds rules and judgements which I try to avoid. For me, eating healthily just translates into cooking from whole foods. I cook about 95% of my homecooked meals from scratch and I try not to snack too often on pre-packaged stuff like chips and biscuits. Unless it’s a weekend, I’m entertaining and I can’t pass up a packet of Red Rock Deli lime and black pepper chips!

So, as a simple answer to what I’m doing to lose weight – it’s this blog. It’s cooking. This blog is a diary of the actual foods that I eat. Everything on here I have cooked and eaten. With the exception of things like the cakes and biscuits that are for an event – Mothers’ Day, birthdays, etc. – it is just what I had to eat day-to-day. But food is my life – I love cooking it, eating it, and sharing it. So sometimes I’m going to eat that sort of stuff too, so that stuff will also go on the blog. Apart from eating my own cooking, I am working on being a more mindful eater at all times – at home and out at restaurants etc to reduce my portion sizes to more reasonable amounts. This on top of 3 gym sessions a week is what I’m “doing” to improve my overall wellbeing and as a by-product, my weight.

Noticing that I haven’t really included much by way of breakfasts – even though it’s my favourite meal of the day, I thought today I will post my current work-day staple. Given that it’s summer, instead of having porridge, I have oats and Greek Yoghurt. I soak my oats overnight to soften them, and I have started using coffee to soak them in. So. Good. I eat this every day at work, and tend to steer towards eggs and/or toast on the weekends. Work day lunches are generally leftovers and dinner is open!

I’ve recently discovered the joys of cold brewing things. On Sunday nights I will grind some coffee beans and put them in a coffee plunger. I pour cold water over the top, cover it with plastic wrap, put it in the fridge and allow it to brew overnight. When you wake up, you just push the plunger down and BAM! Perfect ice coffee. I make it strong (1 cup coffee to 4 cups water), then dilute with water and/or milk depending on what I’m feeling like or some maple syrup if I feel like some sweetness. The jug will do Lance and I for a almost a week that way. I have started using the same technique for ice tea too. In both drinks it prevents the bitterness you get from hot brewed drinks that have been cooled.
 
Coffee, Oats and Yoghurt
1/3 cup rolled oats
1/3 cup cold brewed coffee
1/8 tsp cinnamon
1/8 tsp ginger
6 prunes, chopped small
8-10 walnuts, roughly chopped
To serve
4-5 heaped tablespoons plain Greek Yoghurt (around 150-200g)

In a container with a lid put the oats and spices, put the lid on and shake to mix. Pour the coffee over the top. Add the chopped prunes and walnut pieces to the top of that. Put in the fridge overnight.

When ready to eat, take out, spoon the yoghurt over the top and mix it all together really well.

Caffeine, protein, fibre, fruit, good fats. Breakfast of champions.


Sunday, December 29, 2013

Bagel Bombs Part 2 - Garlic and Cream Cheese Bombs

I think I mentioned in Part 1 of this Bagel Bomb series that I made the sweet potato and bacon bagel bombs because someone attending the party didn't eat cheese? Well, I decided I wanted to have cheese ones anyway, so I made two lots.  I've started making both types every time I make them, just doubling the dough recipe (my awesome new KitchenAid can handle it!). I honestly cannot choose my favourite of these. Everyone else tends to lean one way or the other. I'm happy to eat two though. And usually, two more...

I don't have many photos from these ones, or at all currently. I've been very slack with my food photography . Which is possibly for the best, seeing as my laptop screen is cracked and it's not so easy to process them! Hopefully things will get back on track in the new year!


Dough – adapted from the Momofuku Milk Bar Cookbook:3 ½ cups flour (I used 2 cups plain, 1 cup wholemeal and ½ cup spelt)
1/2 tbsp salt
1 tsp raw sugar
1 1/8 tsp active dry yeast
1 ¾ cups water, at room temperature
1 tablespoon vegetable oil (I used rice bran oil)
Filling
1x 250g packet Philadelphia cream cheese
1 tsp salt
2 tsp sugar
1 clove galic, minced
2 tbsp oil (I used bacon fat)
¼ cup flat leaf parsley leaves, roughly chopped

Egg Wash Topping:
1 egg, at room temperature
¾ tsp freshly ground rock salt
1 tsp sesame seeds
1 tbsp rolled oats, roughly chopped

Heat the oil to medium/low heat in a frypan and add the minced garlic, stir around until fragrant and starting to go golden. Turn off the heat and set aside.

Using a hand beater, blend the cream cheese on low until smooth. Add the garlic (include any oil left in the pan), salt, parsley and sugar, then beat to combine.

Using two teaspoons, roll heaped teaspoonsful of this mixture between the spoons, pushing down to compact slightly and put on a tray lined with baking paper. Put in the freezer for a few hours (while you make the dough) to set hard. This makes it much easier to form the bombs later. You will need 16 balls.

Stir together all of the dry dough ingredients with the hook of your standmixer in the bowl of your standmixer by hand. Add the water, and mix with your hand until it’s mainly come together. Attach the bowl and hook, and beat the dough on low for 5-10 minutes, until it comes together into a smooth ball.  You might need to add more flour to get the right consistency. Lightly coat another large bowl with oil and put the dough ball into it, roll to coat the dough with oil too. Cover with plastic wrap and put in a warm corner for 45 minutes until the dough has almost doubled in size.

Heat the oven to 175C

Punch down and flatten the dough on your countertop. Cut the dough into 16 pieces and loosely cover the dough you aren’t currently forming with the plastic wrap from the bowl earlier to stop it drying out.

Roll each portion into a neat ball in your palms, then use your palm and fingers to stretch out into a flat disc. Place a ball of the filling in the centre, then pull all of the edges up and around the mixture. Pinch shut, then roll the ball gently in your hands to smooth into a neat ball. Place on a lined baking tray.

Whisk egg, then brush each bun with a generous amount. Mix all of the other wash ingredients together in a bowl and sprinkle over the top.

Bake for 20-30 minutes until golden, allow to cool for 5-10 minutes before eating because the filling stays quite hot!

Friday, December 27, 2013

Bagel Bombs Part 1 - Sweet Potato & Bacon


My husband has endured many a shopping trip with me detouring us past the Kitchen Aid Mixers, while I gaze longingly at all their amazing colours, before sighing and getting on with the boring shopping. So when I told him I was entering the Summer Bake-Off recipe, he supported me but was a little less excited than he normally would be. He’s always excited for me to cook more things, because he gets to taste-test them, so it was a little unusual! I chose to make Hot Chocolate Ice Cream Sandwiches (malt ice cream sandwiched between chilli chocolate cookies) and entered the competition.  Fast forward a few weeks to my birthday, and he gives me an I.O.U...if necessary. He was going to buy me a Kitchen Aid for a present, but he’s so confident in the deliciousness of my recipe that he didn’t want to buy one and end up with me having two. He said it was actually a bit of a relief, considering the pressure of picking the right colour! He’d been trying to get me to tell him which one I wanted, but I kept liking several colours.

Sadly, I didn’t win the competition, so Lance and I went and picked out a mixer for a belated birthday present. And the first thing I wanted to make in it is bread. I have been a little addicted to breads lately, and I had tested this recipe before as something  to take to a bring-a-dish Christmas party. I remembered seeing a cheese filled bagel bomb years ago on pinterest. I can’t find the original recipe to link to, but I do remember that the dough and basic idea came from the Momofuku Milk Bar Cookbook. I didn’t get to the Milk Bar in my last NY trip, but we did have udon and pork buns at the Momofuku Noodle bar. The pork buns were amazing! So good! One of the attendees doesn’t like cheese (crazy, I know. Don’t worry, I mock her for this), so I though a vegetable filling would be better. And added bacon. In fact, if you have some, you can sub the bacon mixture from this for ½ cup bacon jam and it’d be delicious!

These are best served straight from the oven, so I par-baked them, then did the last 10 minutes at the venue.

Bagel Bombs Part 2 will be garlic and cream cheese bagel bombs! Both these and the garlic bombs have become my current most-requested dish! Any leftovers are perfect reheated for 10 minutes in the oven for breakfast!


Dough – adapted from the Momofuku Milk Bar Cookbook:
3 ½ cups flour (I used 2 cups plain, 1 cup wholemeal and ½ cup spelt)
1/2 tbsp salt
1 tsp raw sugar
1 1/8 tsp active dry yeast
1 ¾ cups water, at room temperature
1 tablespoon vegetable oil (I used rice bran oil)

Filling
2tbsp olive oil
3 medium sweet potatoes
4 rashers bacon, finely diced
1 large garlic clove, minced
½ tsp smokey paprika
½ tsp sweet paprika
½ tsp black pepper
¼ tsp cinnamon

Egg Wash Topping:
1 egg, at room temperature
¾ tsp freshly ground rock salt
¾ tsp raw sugar
½ tsp smoked paprika
sesame seeds optional garnish

Heat the oven to 150C

Split the sweet potatoes lengthwise, rub oil on the split, then place cut-side down onto  a baking tray and bake until soft – around 40 minutes. Set aside to cool.

Heat the olive oil to medium/low heat in a frypan and add the minced garlic, stir around until fragrant and starting to go golden. Add the bacon and fry for 10-15 minutes until brown and crispy. Add the spices and cook through for a minute.

Scoop the now cool sweet potato flesh into a bowl, add the bacon mixture and mix thoroughly to combine evenly. Using two teaspoons, roll heaped teaspoonsful of this mixture between the spoons, pushing down to compact slightly and put on a tray lined with baking paper. Put in the freezer for a few hours (while you make the dough) to firm up. This makes it much easier to form the bombs later. You will need 16 balls.

Stir together all of the dry dough ingredients with the hook of your standmixer in the bowl of your standmixer by hand. Add the water, and mix with your hand until it’s mainly come together. Attach the bowl and hook, and beat the dough on low for 5-10 minutes, until it comes together into a smooth ball.  You might need to add more flour to get the right consistency. Lightly coat another large bowl with oil and put the dough ball into it, roll to coat the dough with oil too. Cover with plastic wrap and put in a warm corner for 45 minutes until the dough has almost doubled in size.

Heat the oven to 175C

Punch down and flatten the dough on your countertop. Cut the dough into 16 pieces and loosely cover the dough you aren’t currently forming with the plastic wrap from the bowl earlier to stop it drying out.

Roll each portion into a neat ball in your palms, then use your palm and fingers to stretch out into a flat disc. Place a ball of the filling in the centre, then pull all of the edges up and around the mixture. Pinch shut, then roll the ball gently in your hands to smooth into a neat ball. Place on a lined baking tray.

Whisk egg, then brush each bun with a generous amount. Mix all of the other wash ingredients together in a bowl and sprinkle over the top.

Bake for 20-30 minutes until golden, allow to cool for 5-10 minutes before eating because the filling stays quite hot!

Oh, and I chose the melon mixer


Monday, November 25, 2013

Birthday Breakfast - Pumpkin Muffins with Maple Icing and Candied Bacon


It was recently my birthday, and given there’s not currently an actual law allowing me to not be at work and still be paid…I thought I would at least make sure I had a decent breakfast. I may have stated on a few occasions that breakfast is my favourite meal of the day. I often eat breakfast at my desk at work, as I get in pretty early, and so I wanted something different for birthday morning. Something delicious. And something easy to prepare and eat. Which meant I needed something with maple syrup. With bacon. And something I can just pick up and chomp on. This has the benefit of being pretty darn healthy, too. Wholemeal flour, pumpkin, greek yoghurt, no extra butter or oil and no processed sugar. Until you add the icing, anyway. And bacon doesn’t count as being bad for you. Especially not on your birthday.

I cross my fingers that one day, Melbourne Cup Day becomes an Australia-wide public holiday so that every time it falls on my birthday I get a day off work. Until then, there are these muffins.


Pumpkin Muffins with Maple Icing and Candied Bacon
Dry
½  cup wholemeal flour
¼ cup coconut flour
2/3 cup plain flour
½ tsp baking powder
1 tsp bicarb soda

1 tsp ground cinnamon
½ tsp ground ginger
½ tsp ground nutmeg
¼  tsp salt


Wet
2 eggs, lightly beaten
1 cup pumpkin puree
½ cup Greek yoghurt
2 tsp vanilla extract
½ cup honey

Icing
5 tbsp icing sugar
2 drops aromatic bitters
3 tbsp maple syrup
1 tbsp milk (+ more if required)

Candied bacon
4 bacon middle rashers, fat removed and very finely diced
3 tbsp maple syrup
Pinch cayenne pepper
Pinch black pepper

 
Fry the bacon pieces until coloured and slightly crispy. In a small bowl, mix the cayenne pepper, black pepper and maple syrup. Pour in the bacon, stir to coat well. Spread out onto a lined baking tray. Don’t allow it to clump too much.

Preheat your oven to 350 F (175 C). Line a muffin tray with papers.

In a bowl whisk all the dry ingredients.

In a separate bowl whisk all the wet ingredients together until well combined.

Pour the dry ingredients into the wet ingredients and stir with a spatula until just combined. Don’t over mix.

Spoon the batter into the patty pans.

Bake for 15 to 20 minutes or until golden on top. Put the bacon into the oven at the same time. Bake for 10 minutes or so, until the bacon gets crispier and the maple syrup gets a toffee like consistency. Allow to cool completely.

Allow to cool for 15 minutes in the tray before putting onto a rack to cool completely.

Whilst waiting for things to cool, sift the icing sugar into a separate bowl, then add the maple syrup and milk. Whisk until smooth. If necessary, add more milk to thin out. Add the bitters and mix very well. Be careful not to add too much bitters, you really only need 2 drops.

Drizzle a little on each muffin, then sprinkle some candied bacon on top and leave for the icing to ‘set’.


Monday, September 9, 2013

Comfort Food - Pina Colada Pudding Cake

Do you like pina colada? I actually don't like the cocktail so much, they're usually a tad too sweet for my drink tastes - but I do love the pineapple and coconut combination. It's a classic! Remember my Greek Yoghurt Souffle with pineapple, mango and coconut fruit salad? It was amazing! Loving the combo, when I saw a recipe for pina colada pudding, I was intrigued. And then disappointed and overwhelmed by all of the sugar in it. So I decided to make my own version, using a basic self-saucing pudding recipe as my base. Then, instead of using regular flours, I decided to use coconut flour, for fairly obvious reasons and superfine polenta to give it a nice golden colour. Which then makes this pudding cake gluten free!

It should be saucy at the bottom, but the pictures I've got show mine didn't turn out super saucy. Namely because my dish wasn't large enough, and I spilt most of the boiling water on the floor while trying to put it in the oven. Not my finest culinary moment, and I knew it was a bad idea when I was doing it. With an audience. But the cake still came out nice and moist and the pineapple pieces added a nice juiciness. That's why I've called it a 'pudding cake' instead of a straight pudding.

It is a decidedly unglamourous cake in presentation - but great for putting out as a serve-yourself dessert for a large amount of people. It will serve 10-12 easily. And then if you're lucky, you'll have leftovers for breakfast the next day (or three) reheated in the microwave!


Pina Colada Pudding Cake

825g can pineapple pieces - juice drained and reserved
1 tbsp dark brown sugar
2 tbsp dark rum
1 cup superfine polenta
3 tsp baking powder
1 tsp bicarb soda
2 tsp vanilla extract
2 small tins coconut milk
2 eggs, beaten
2 tsp honey
2 cups boiling water
1/4 cup sugar

Preheat oven to 160C

In the bottom of a big casserole dish, empty the drained pineapple pieces, the dark rum and the dark brown sugar, stir to combine, then spread evenly over the bottom of the dish.

In a large bowl, whisk together the coconut flour, polenta, baking powder and bicarb soda. In a smaller bowl, whisk together 1 cup of the reserved pineapple juice, coconut milk, eggs, vanilla and honey. Whisk together the liquid mixture into the dry mixture, then spread this batter over the pineapple.

Sprinkle the sugar over the top of this mixture, add the remaining pineapple juice to the boiling water and carefully pour this over the top of the batter. Don't mix it in.

Pop it in the oven to bake for approximately 50 minutes, or until the cake is cooked all the way through, and the top is golden.

Serve warm with vanilla or coconut ice cream!

Wednesday, August 14, 2013

Obsession - Pretzel Rolls


Pretzel Rolls. If you are like me and love nothing more than sitting down to freshly baked bread, still warm from the oven , smeared with butter - then these two words are going to change your life. One of the sponsors of the Sweet Escape retreat was LaBriola bakery, and they gave Alejandra (and hence us) a whole bunch of pretzel rolls. And they were good. Addictively good. Can't eat just one good. When I got home, I immediately googled recipes for pretzel rolls, needing them in my life. I've made these twice now and love them. They're not quite as good as the La Briola ones, but they are definitely an adequate at-home substitute! Both batches were gobbled up by my guests pretty quickly, so that's a fairly good indication of yumminess.

The first time I made them, I made the dough in a stand mixer that is woefully poor at actually mixing more than the small centre of the bowl where the blade sits and had to knead the rest in by hand. I can't wait til I finally get around to saving enough for a KitchenAid! The second time I made them, I used a breadmaker to mix the dough. This method worked well, but the dough ended up a bit sticky, so I needed hand-knead in some extra flour. Until I get my KitchenAid, I will be sticking with the breadmaker method, and checking earlier on to see if the dough is sticky. If you have a good stand mixer, then that will work.

As I said, these are perfect with just some butter, but also great as slider buns. Let's face it - any time you need a bun these are perfect. I realised I forgot to take a photo of them sliced up with said butter or fillings - but I was too busy eating them. Maybe next time, I'll pop it on instagram


Pretzel Rolls
adapted from here

1 1/2 cups warm water (as hot as your tap gets)
1 tbsp dry yeast
2 tsp sugar
4 1/2 cups plain flour
1 tsp salt
4 tbsp melted butter
1 beaten egg for glazing

Poaching:
8 cups water
1/4 cup bicarb soda

Start by melting the butter, and setting aside to cool slightly.

Pour the warm water, sugar and yeast into the bowl of the breadmaker, stirring together. Leave it to sit for about 10 minutes until it's foamy.

Add the flour, salt and butter, then set the breadmaker on the dough setting. Watch as it comes together, and once it's all combined (about 10 minutes into kneading for mine), gently and safely touch the dough to see if it's 'sticky' to the touch. If it is, add a tbsp of flour at a time until it's not sticky. I added an extra 4 tbsp to mine.

Once the dough is a good consistency, leave the dough setting to finish and it will do it's first rise in the bowl of the machine.

For standmixer, follow the breadmaker instructions as above up until the rise - it'll need around 5-10 minutes of kneading time. Then cover bowl with plastic wrap and place in a warm position for 1-2 hours until doubled in size.

Lightly flour your work surface and drop the ball of rised dough out onto it. Knead lightly into a flatter disc and cut into 16 equal pieces for slider sized buns. Take each piece and roll around in both hands, so you have a smooth ball. Place on a baking sheet lined with baking paper. Repear with all the pieces of dough, leaving room on the tray for them to rise again. Place in a warm spot 30mins to an hour. They won't quite double again, but will look puffier.

Now it's time to prepare for baking! Preheat oven to 225C. Place the water and bicarb soda into a large pot and bring to a simmer. Beat the egg for the glaze.

Carefully slide each roll "flat" side down into the poaching water, let it sit for 30 seconds, flip it over and let it sit "round" side in the water for another 30 seconds. Flip it back over and fish it out with a slotted spoon and pop it back on the baking sheet, flat side down.

Brush each poached roll with the egg wash and slash a deepish line across the middle with a knife (if desired, you can sprinkle salt on top, too).

Bake the rolls in the oven for 15-20 minutes, rotating trays half-way through, so the rolls are an even golden brown and sound hollow when you tap the base. Allow to cool slightly before eating. Best served warm!


Sunday, March 10, 2013

Breakfast Love - Greek Yoghurt and Coconut Souffle

I love breakfast. It's my favourite meal of the day. Maybe the bacon love has contributed to it's special place in my heart, I'm not sure. All I know is that I love breakfast. In fact, before my husband and I started dating, I gave him a little disclaimer that if we were a couple, we'd probably have to go on a few breakfast dates, even though he rarely ate breakfast back then. We now have our own favourite breakfast cafe. On weekdays, my breakfast is fairly steady - oats, greek yoghurt, some form of fruit. Simple, nutritious and yum. I'm not one of those people that get bored eating the same breakfast every day. However, that is "work day" food, so I don't want to eat the same thing on the weekend. I feel like I need something different to celebrate the fact that it's my time. I'm a bit weird like that.

I spied this recipe for Greek Yoghurt Souffle on pinterest the other day and was intrigued. I've never attempted a souffle before. To me, they are one of those mysterious things that are notoriously temperamental and therefore 'to be avoided'. I've seen many a breakdown in pop culture related purely to souffles that did not rise. But this one seemed relatively easy, and it was made with Greek Yoghurt - a favourite of mine...maybe it was time to give it a shot?

You may recall a previous post about how I'm not a gardener? Well, that doesn't matter to our mango tree, which decided to produce a fair amount of fruit this year. Walking into the kitchen to the beautiful summery smell of fresh mangoes told me that this was the perfect day for trying a light souffle. I replaced the normal flour for coconut flour to continue the tropical flavours, and added shredded coconut to the fruit salad. It didn't rise quite as much as it should have, and flattened quickly, but it tasted amazing. Next time I'd maybe make 4 larger ones, rather than 6 smaller ones to rise more and make it look more impressive!

And if, like me, you decide to make breakfast for someone special, this is perfect for breakfast in bed. It can all be eaten with a spoon, no messy cutting like eggs, bacon and toast have. The do go flat really, really quickly though - so serve them up straight away!


Greek Yoghurt and Coconut Souffle
1 cup Greek Yoghurt
3 large eggs, separated
3 tbsps coconut flour
pinch salt
1 tsp vanilla
pinch cream of tartar
1/4 cup sugar
butter/extra sugar to line ramekins

Preheat oven to 180C (the original recipe called for bottom heating only - who am I to argue)
Butter, then sugar the ramekins, tapping out the excess sugar. Line them up on a baking tray to make it easier to put in the oven.
Whisk yoghurt, yolks, coconut flour, salt and vanilla together in a large bowl
In a separate bowl, beat the whites and cream of tartar until foamy. Slowly add the sugar and keep beating until firm soft peaks form.
Slowly fold the egg white mix into the yoghurt mix, a little at a time. Make sure you fold it carefully to keep the air in the egg whites.
Divide into the ramekins, then put them in the oven for around 15minutes until risen and lightly browned.

Serve with your favourite fruit!